
Table of contents
- Overview
- What is Next Gen?
- 1. Access Next Gen within your GotPhoto dashboard
- 2. Turnaround times
- Job workflow
- 1. Planning your photo job
- 2. Take photos
- 3. Upload your photos
- 4. Navigate to the photo editing tab
- 5. Map data to Next Gen
- 6. Request editing and checkout
- 7. Product selection and checkout
- 8. Turnaround period and proofing
- 9. Organize your graphics
- 10. Job settings
- The takeaway
Overview
Take your Sports photography to the next level with Next Gen, GotPhoto's comprehensive Volume Sports solution. This allows you to outsource your sports graphics tasks and manage the entire operation seamlessly through your GotPhoto account. In this article, we'll review the process of the workflow.
Would you like a quick overview instead? We’ve put together three concise walkthrough demos that give you clear insight into each stage of the workflow:
- Full Workflow Demo
Watch the end‑to‑end process in action. - Next‑Gen Validation Page
See how we verify that your job is ready for submission to Next Gen. - Checkout Page Walkthrough
Follow along as we guide you through selecting and completing your offering.
Feel free to jump straight to whichever demo you need!
Looking for additional tips? Check this resource: On-Demand: Next Gen Tips & Tricks Customer Webinar April 2025
What is Next Gen?
Next Generation Photography Solutions is a GotPhoto graphic service that offers virtual and traditional group and individual graphics. Outsourcing your graphics creation frees up your precious time to focus on your business and acquire more jobs (and even have more time for yourself!). In addition, Next Gen provides enhanced and high-quality offerings for your proofing shop, with a wide variety of templates to choose from.
This article will focus on volume photography and the creation of virtual group and individual graphics.
For information on using traditional team images for graphic creation with Next Gen, see Next Gen: Create Traditional Sports Graphics
To learn more about Next Gen’s à la carte services, see the separate article on Next Gen À La Carte Services.

Every GotPhoto customer can use the Next Gen integration. You can review the Next Gen pricing here: Next Gen Bundle Pricing
1. Access Next Gen within your GotPhoto dashboard
You can access the integration via your sports job's editing tab. Ensure that you select a sports type for your job. Before you request a job, we ask that you complete a brief training and a quiz. Learn more below.
2. Turnaround times
Please follow the recommended practices outlined later in this article to ensure a smooth and efficient process. Inaccurately shot photos demand additional design time. Our turnaround estimates reflect the maximum number of business days and do not include weekends or holidays.
New Order for Proofing
| Job Size | ETA |
|---|---|
| Small Jobs (1–100 Images) | 2 Days |
| Medium Jobs (101–200 Images) | 3 Days |
| Medium+ Jobs (201–500 Images) | 4 Days |
| Large Jobs (501–900 Images) | 5 Days |
| Extra Large Jobs (900+ Images) | 6 Days |
The above table shows the processing time for proofs, where you will have the option to review a set of graphics.
Job Finished After Proofing
| Job Size | ETA |
|---|---|
| Small Jobs (1–100 Images) | 1 Day |
| Medium Jobs (101–200 Images) | 1 Day |
| Medium+ Jobs (201–500 Images) | 2 Days |
| Large Jobs (501–900 Images) | 2 Days |
| Extra Large Jobs (900+ Images) | 2 Days |
The above table shows the turnaround time for editing the whole job after you approve the samples. Here's a quick example: For a job with 600 images, you can estimate approximately 5 business days in total: 2 days to create your graphic set for proofing, 1 day for your review, and 2 days to receive the final graphics.
Job workflow
Video tutorials
Don't feel like reading? Check these step-by-step video tutorials:
- Part 1: Next Gen - Setting up a Job
- Part 2: Next Gen Checkout Steps — Choose alternative images for products and customize options like background templates, themes, colors, and shooting references.
1. Planning your photo job
A. Create a new job in GotPhoto.
- Select a sports type when you select your job type.
- Use QR tagging with a list of names in your job settings as your tagging method.
- If you don't have a names list and use the Pre-registration for picture day feature, this article includes instructions to pre-create albums to prevent custom team names.
B. Upload your roster to the job.
Ensure team names match the Group column in GotPhoto. Fields First Name, Last Name, and Group (=Team) are mandatory for a Next Gen job. Group names will appear in the composites, e.g., “Hurricanes.”
If an athlete/coach is in multiple teams, enter them separately for each. Don’t list multiple teams in one row. Use the Division field if teams share the same name (e.g., U6 Tigers, U12 Tigers).
If you don’t want division text on the templates, include a note in Special Instructions at checkout or when reviewing the proofs.
Optional: Use the Identifier column for jersey numbers. This is passed to Next Gen but isn’t required.
C. Create QR cards. Prefer barcode workflow? Review this article on Entagged.

2. Take photos
While Next Gen can extract images with any background, we recommend shooting on a solid white or gray background for best results. Take photos of individuals: Photograph the athlete's QR card, then the subject.
Check out the following articles for essential information on getting the right photos for extraction:
- Best Practices For Great Extractions
- Best Practice For Consistent Scaling and Lighting
- Best Practices For Individual Posing
You can upload up to 16 images of the athlete for Next Gen graphics:
- First image = team composite pose. Save time by shooting it first. If the same image is for both team and individual, duplicate and rename it. Example: The filename 1 is Abigail123; you should duplicate that image and assign a new filename such as Abigail_123.
- Match backdrop tone to your template: grey for dark designs, white for bright ones. Especially important for translucent clothing.
- Besides the team photo, up to 15 other individual photos can be uploaded and used for additional sports graphics.
- Buddy photos: Multi-tagging is not supported. Include buddy shots as part of one individual’s gallery (within the 15 -image limit), send them through the Next Gen editing process, and afterward manually tag the edited graphics with the second access code. (Learn how to handle by reviewing: Next Gen: Common questions & answers
- There is no need to crop the photos. Next Gen will take care of this when they extract the backgrounds.
- File names: Avoid using special characters such as /, \, :, *, ?, ", <, >, |, &, %, #, and spaces. These symbols can interfere with file paths, cause errors during uploads, or lead to misinterpretation by operating systems and web servers. To ensure compatibility and prevent issues, stick to using letters, numbers, underscores (_), and hyphens (-).Avoid filenames with a (.) dot or using multiple dots, which can confuse file extensions or hide files unintentionally.
3. Upload your photos
Upload and organize your photos in GotPhoto before sending them to Next Gen.
1. Upload your photos using one of the faster methods.
- Upload only JPGs in sRGB color space.
- Images are limited to a maximum of 5000 pixels on the long edge. PNG files used for graphics and returned for sales will not exceed this resolution.
Follow this article to sort images before activating access codes.
⚠ Important: All galleries must be sorted into team folders. Use the option under Manage individuals within your album, and select Resort photos to albums.


After activating access codes, the image following the QR card will be automatically starred. This becomes the team photo.
To change the team pose, select and favorite the desired image:


Verify your data and structure:
- Team images are a job-level choice: If one team has one, all do.
- Use the Review page filter to find galleries with issues.
- Double-check accuracy of names, teams, and image order.
- Ensure starred image is correct for the team graphic.
- Unhide all images intended for Next Gen. Hidden ones are skipped.
- Each subject (coach/athlete) must have a unique access code. Buddy photos appear in only one gallery after mapping, and graphics are returned to that one only.
4. Navigate to the photo editing tab
Access the Next Gen integration from your photo job's editing tab.
- Navigate to the Photo Editing tab in your job. In the Next Gen section, click Continue.

Complete the training and quiz (approx. 45 minutes). Confirm completion and proceed to the integration view.

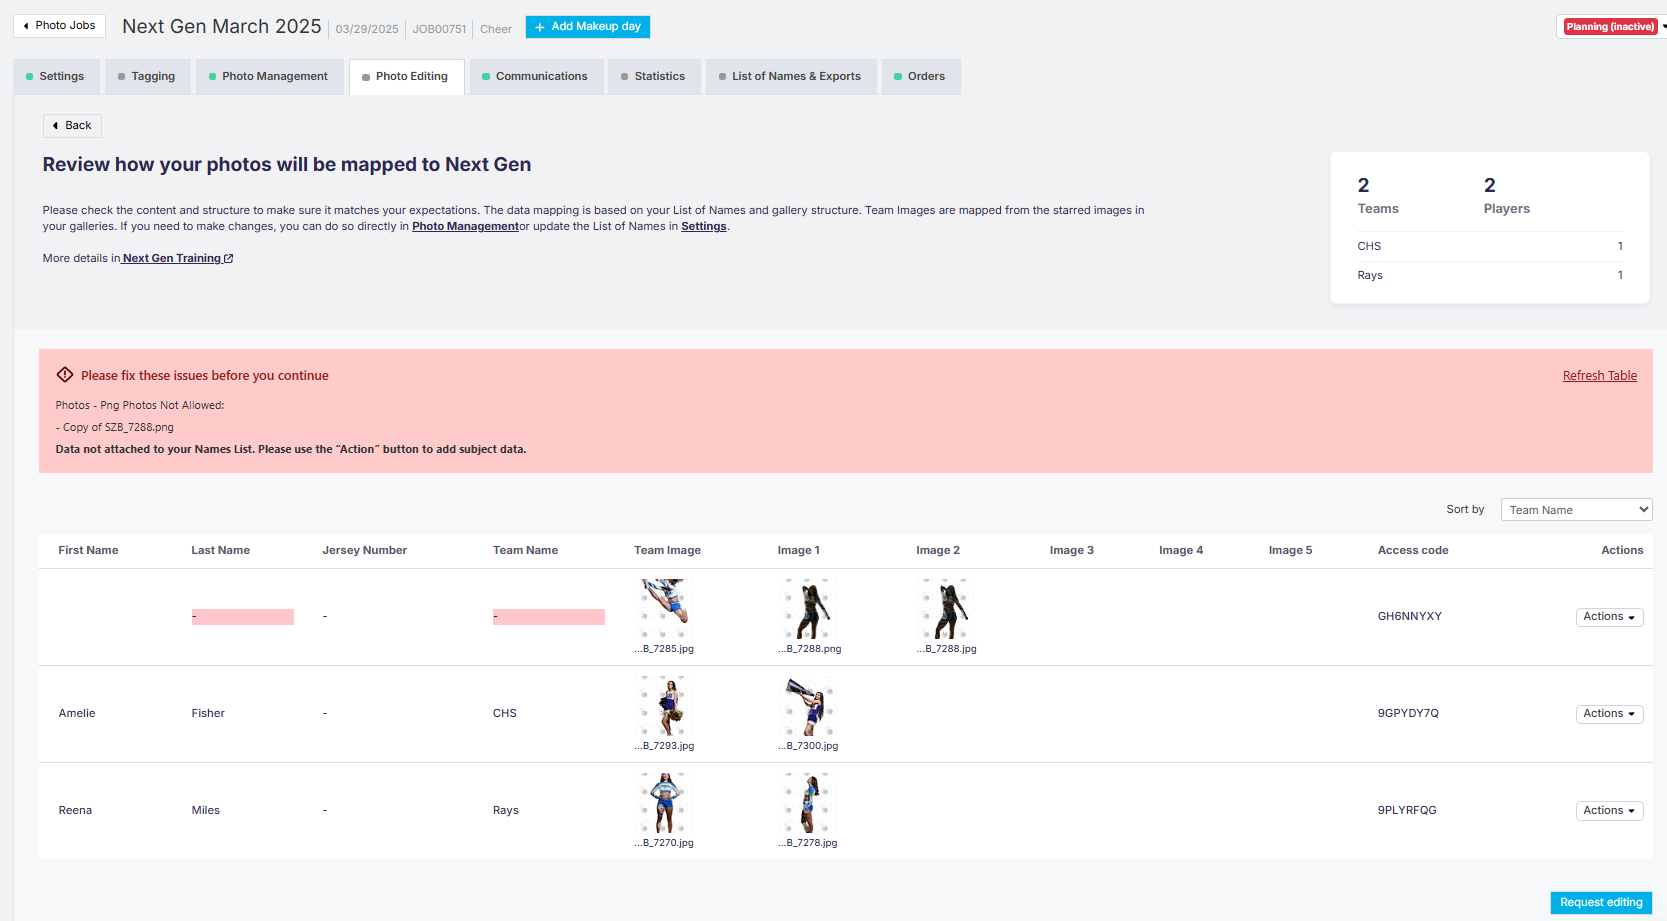
5. Map data to Next Gen
Review how first names, last names, team names, and images will be sent to Next Gen.
Reminder: If you're using the same image for both individual and team graphics, duplicate and rename it in the athlete’s gallery so it appears in the 1–15 image slots.

View of sample job with 15 individual poses:
You can edit names or team data directly in the editing tab. If there’s an issue, an error message will guide you:
6. Request editing and checkout
Once satisfied with your setup, click Request Editing. GotPhoto will prepare your order for Next Gen.

Click the blue Checkout button to finalize the process. This may take a few seconds.
Important: You must complete the checkout within 5 days of initiating the order. If the deadline passes, you'll need to cancel and resubmit the job.
7. Product selection and checkout
Select graphics, templates, and services on Next Gen's platform. Choose from Full Composite, Traditional, or Traditional+ and configure shadow, reflection, or custom template options.

- Choose team image style: Standard or Virtual Riser Team Build

- Add a graphic team name: If you’d like your team name to appear differently on graphics than in your team list, enter the exact wording here. This ensures your graphics match your preferred style.

- Select your Team & Individual (T&I) background template in the drop-down menu. Click View Designs to see all available designs.

- Three-quarter Templates: The subjects' feet won't be shown.
- Memory Mates are built on an 8x12 canvas; you can sell them as 8x12 versions, but please know that they are designed to crop to 8x10. Many of the designs can be cropped to a 5x7 aspect ratio. However, we don't recommend it, as it may not result in a perfect fit.
Important For Full Length Templates: If you select any template that includes "Full Length" in its title, please make sure to select either Drop Shadow, Image Reflections, or both services together. Reflection is recommended (in addition to Drop Shadow) for shiny surfaces like indoor courts, ice, etc. However, reflection may not be needed in templates where the subject is in grass or dirt.
Customizations:
- Custom template: Custom templates that were purchased through a third-party provider require setup through Off-the-Trail Graphics for a one-time fee and stay permanently in your Next Gen account. Please provide our partner with a proof of purchase.
- Custom background: Custom backgrounds can be uploaded at no cost using one of the provided design skins. At checkout, choose "Custom Background" and upload your image. Background images for Next Gen must be 8 × 12 inches (horizontal) at 300 DPI.


From there, choose one of the skins from the dropdown menu. The skins can be found here.
Next, upload your custom background, and you're all set.
Now, under "Extracted images," select how you want to receive your PNGs:
Manage how to receive the PNGs:
- If you don't tick the box "Attach extracted images to access code," all extracted images will flow back to a new album in your GotPhoto job named "Unassigned." The extractions in this album will no longer be connected to your subjects. You can download them to your device or keep the album in the job. Parents won't see this album when they log into the shop.
- If you tick the box, the extracted PNG files will be attached to your access codes. When you add backgrounds to your job's price list, parents can purchase them in your shop. You can select only the team or individual PNGs, or extractions for both photo types.
- Ensure the background perspective fits your graphics
Additional options:
- You can now request your PNG extractions be cropped before being sent back to you as an additional service.
 The available options are:
- 3/4 crop, full-length crop, or no cropping
- Full-length templates require drop shadow or reflection (recommended for courts/ice)

- Make your color choices and upload your logo (if applicable)

At the bottom of the page, you will see a breakdown of the costs for this job:
- Color correction is offered as an add-on. It includes exposure, white balance, and a touch of sharpening.
- Human verified QC: Premium quality control with human-reviewed extractions and manual edge refinement by expert designers. Not sure if you need this service? Learn more here: When should I use the Premium Human-Verified Extraction (QC Add-on)?
- Please note: The Express option (non-proofing) is only available for Traditional and Traditional+ Graphics.

Review pricing, and proceed to payment. After checkout, you’ll return to GotPhoto.
8. Turnaround period and proofing
Next Gen will start production once your order is submitted. You’ll be notified by email when graphics are ready for proofing (see turnaround times section). 
- Proof all team and individual images
- Use comments to request revisions or resends
- All changes apply to the entire team
- In the online proofing process, eight graphics are produced for individual images. Hence, you will see all eight graphics in proofing, regardless of your selected graphics in the Next Gen checkout process.
- It is important to be as clear and specific as possible to avoid any misunderstanding or misinterpretation by the production team. We want proofing to be as efficient as possible and add as little extra time as necessary.


- If you have added any comments, press Changes Required. Click the checkbox "Send me an email confirmation", so you will be notified and can check the corrected proofs once they have been adjusted.
Once everything looks OK, press "Approved."
After approving the images, you will receive another email that notifies you that the job is now completed.
Go back to your job's Photo Editing tab and review the photos by pressing the blue Review photos now button.
9. Organize your graphics
Decide how to manage original images and new graphics:
- Choose to delete or keep originals
- Select sorting method:
- Remove Originals – Ideal for Full Composite jobs
- Keep Originals – Recommended for Traditional/Traditional+
- Sort by Group – Default by team
- Isolate Memory Mates – All Memory Mates in one album
- Our system will automatically add a file extension (_MM) to all memory mate graphics when releasing them to your job. In GotPhoto, these images will be marked with a purple icon, indicating that these photos are composite photos. When working on a job, you can assign a different price to these composite photos while keeping them in the same gallery as your other graphics. It's important to note that the composite feature is not yet available for prepay jobs, but only for proofing jobs.
- Allows different pricing while staying in the same gallery
- All graphics are tagged as composite photos. Going forward, we will explore options to allow you to select specific graphics (e.g., Memory Mates) for this photo type.
10. Job settings
Adjust your GotPhoto settings to prepare for sales.
- [Proofing only] These steps are only compatible with proofing jobs.
- Choose a price list that supports the composite photo type.
 images.
 - Configure coupons, your automated campaign, and archiving options
- Use Advanced Job Settings as needed
- Set the job to “Selling”
GotPhoto now automatically flags image count changes post-editing in Photo Management. If there are either fewer or more photos, a message will be displayed in Photo Management. This message will detail which files are unexpected or missing. 
Pro Tip: After a job is completed or archived, you might notice a typo or need an additional graphic for that job. This article walks you through opening a help request in your Next Gen account.
The takeaway
Next Gen simplifies sports graphics production so you can focus on your photography business. Its structured workflow - from job setup to final delivery - ensures a smooth and scalable experience.
Have additional questions? Browse our Next Gen: Common Questions & Answers article.