

Note: This article refers to the GotPhoto Tagging App. For the Entagged App, see this help center section: Entagged
Table of contents
- Overview
- Access the GotPhoto app
- Use the app with a physical Entagged device and Name List subscription
- Use the Name List QR feature (no Entagged device required)
- Switch from Entagged barcode tagging to Name List QR
- Scan codes with Entagged
- Manage devices in the Devices screen
- Manage app settings in the Settings tab
- Understand the device status bar
- Your filter options in the GotPhoto app
- Multi-tagging subjects when using an Entagged device
- FAQs
- Key takeaways
Overview
The GotPhoto app is a mobile solution for photo tagging on picture day. It works for all GotPhoto users, whether or not you use a physical Entagged device.
The app enables fast, paperless tagging directly from your smartphone or tablet, even in environments with limited or unstable internet connectivity.
The GotPhoto app offers a redesigned experience with improved usability, simplified navigation, and better device management. While the core workflow remains familiar to Entagged users, the interface is more intuitive and optimized for touch.
This article explains how to access the app and use its key features.
Access the GotPhoto app
Download and install the app based on your device type:
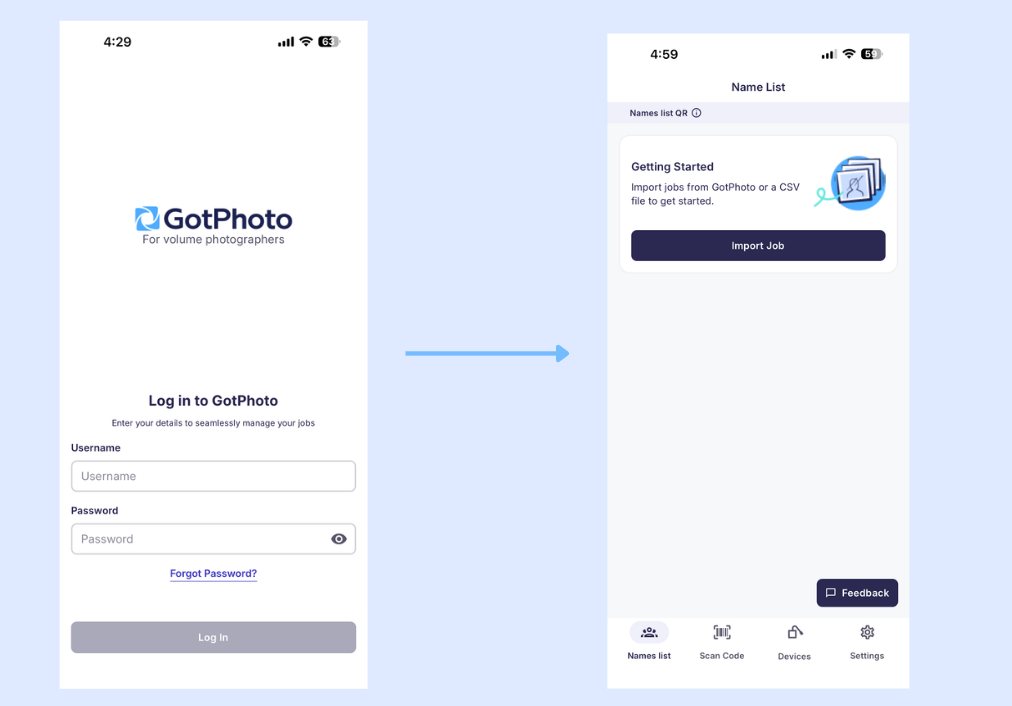
Log in to your account
- Open the app.
- Log in using your GotPhoto credentials.
Use the app with a physical Entagged device and Name List subscription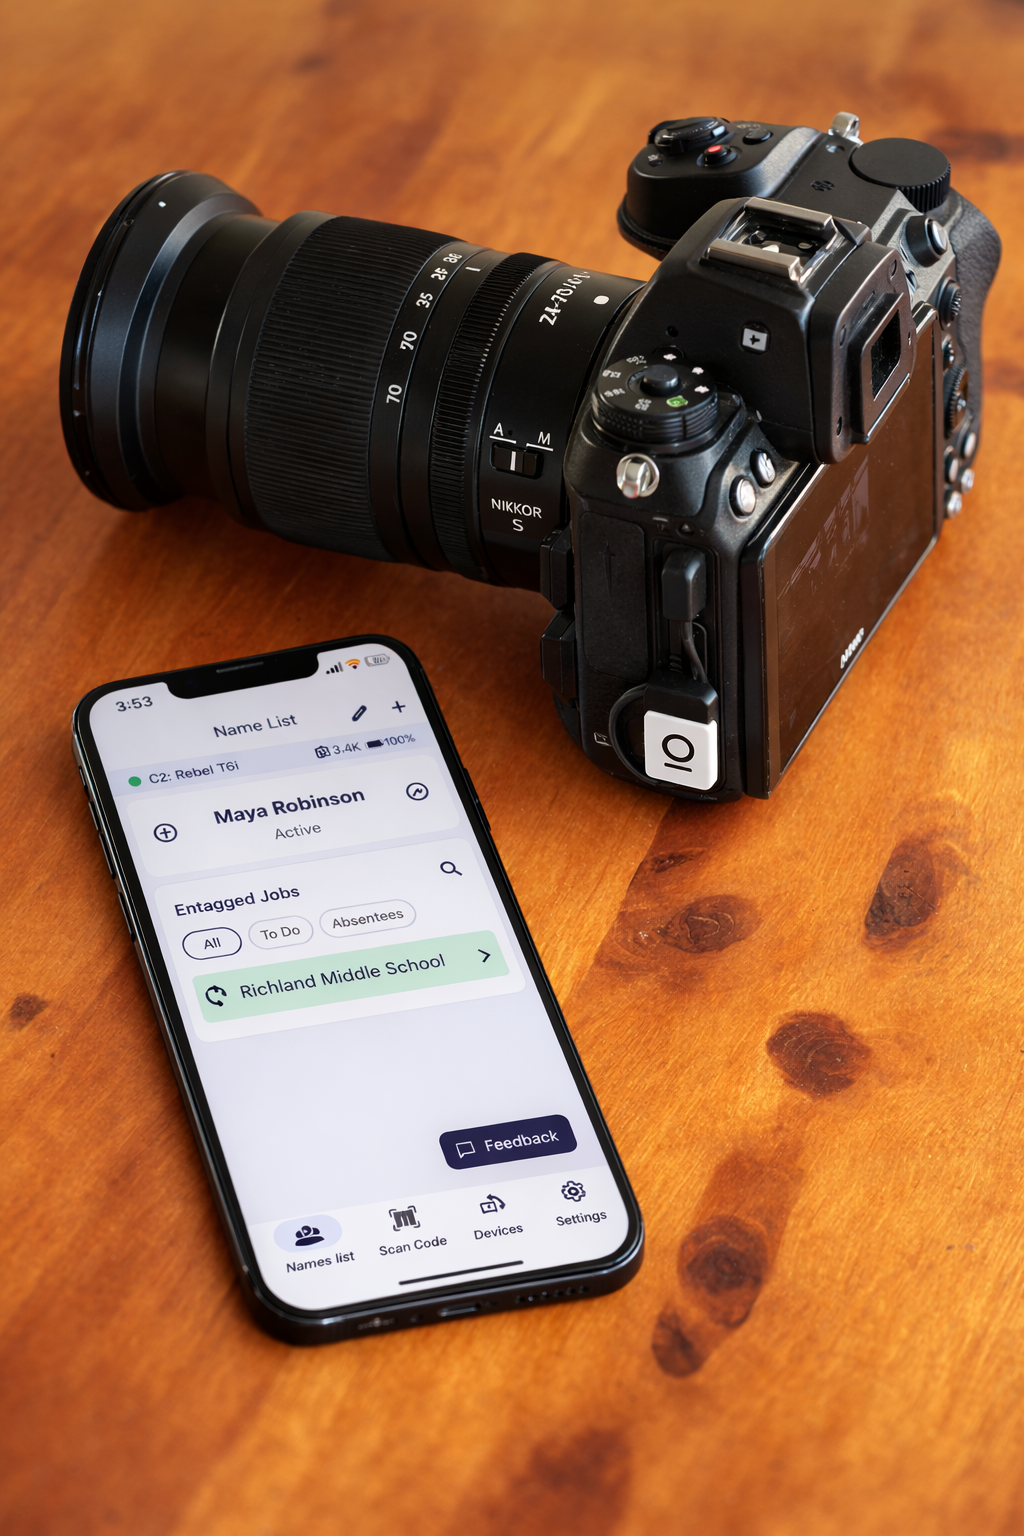
This section applies if you use a physical Entagged device and have an Entagged Name List subscription.
If you do not use an Entagged device, continue with Use the Name List QR feature (no Entagged device required).
Pair your Entagged device
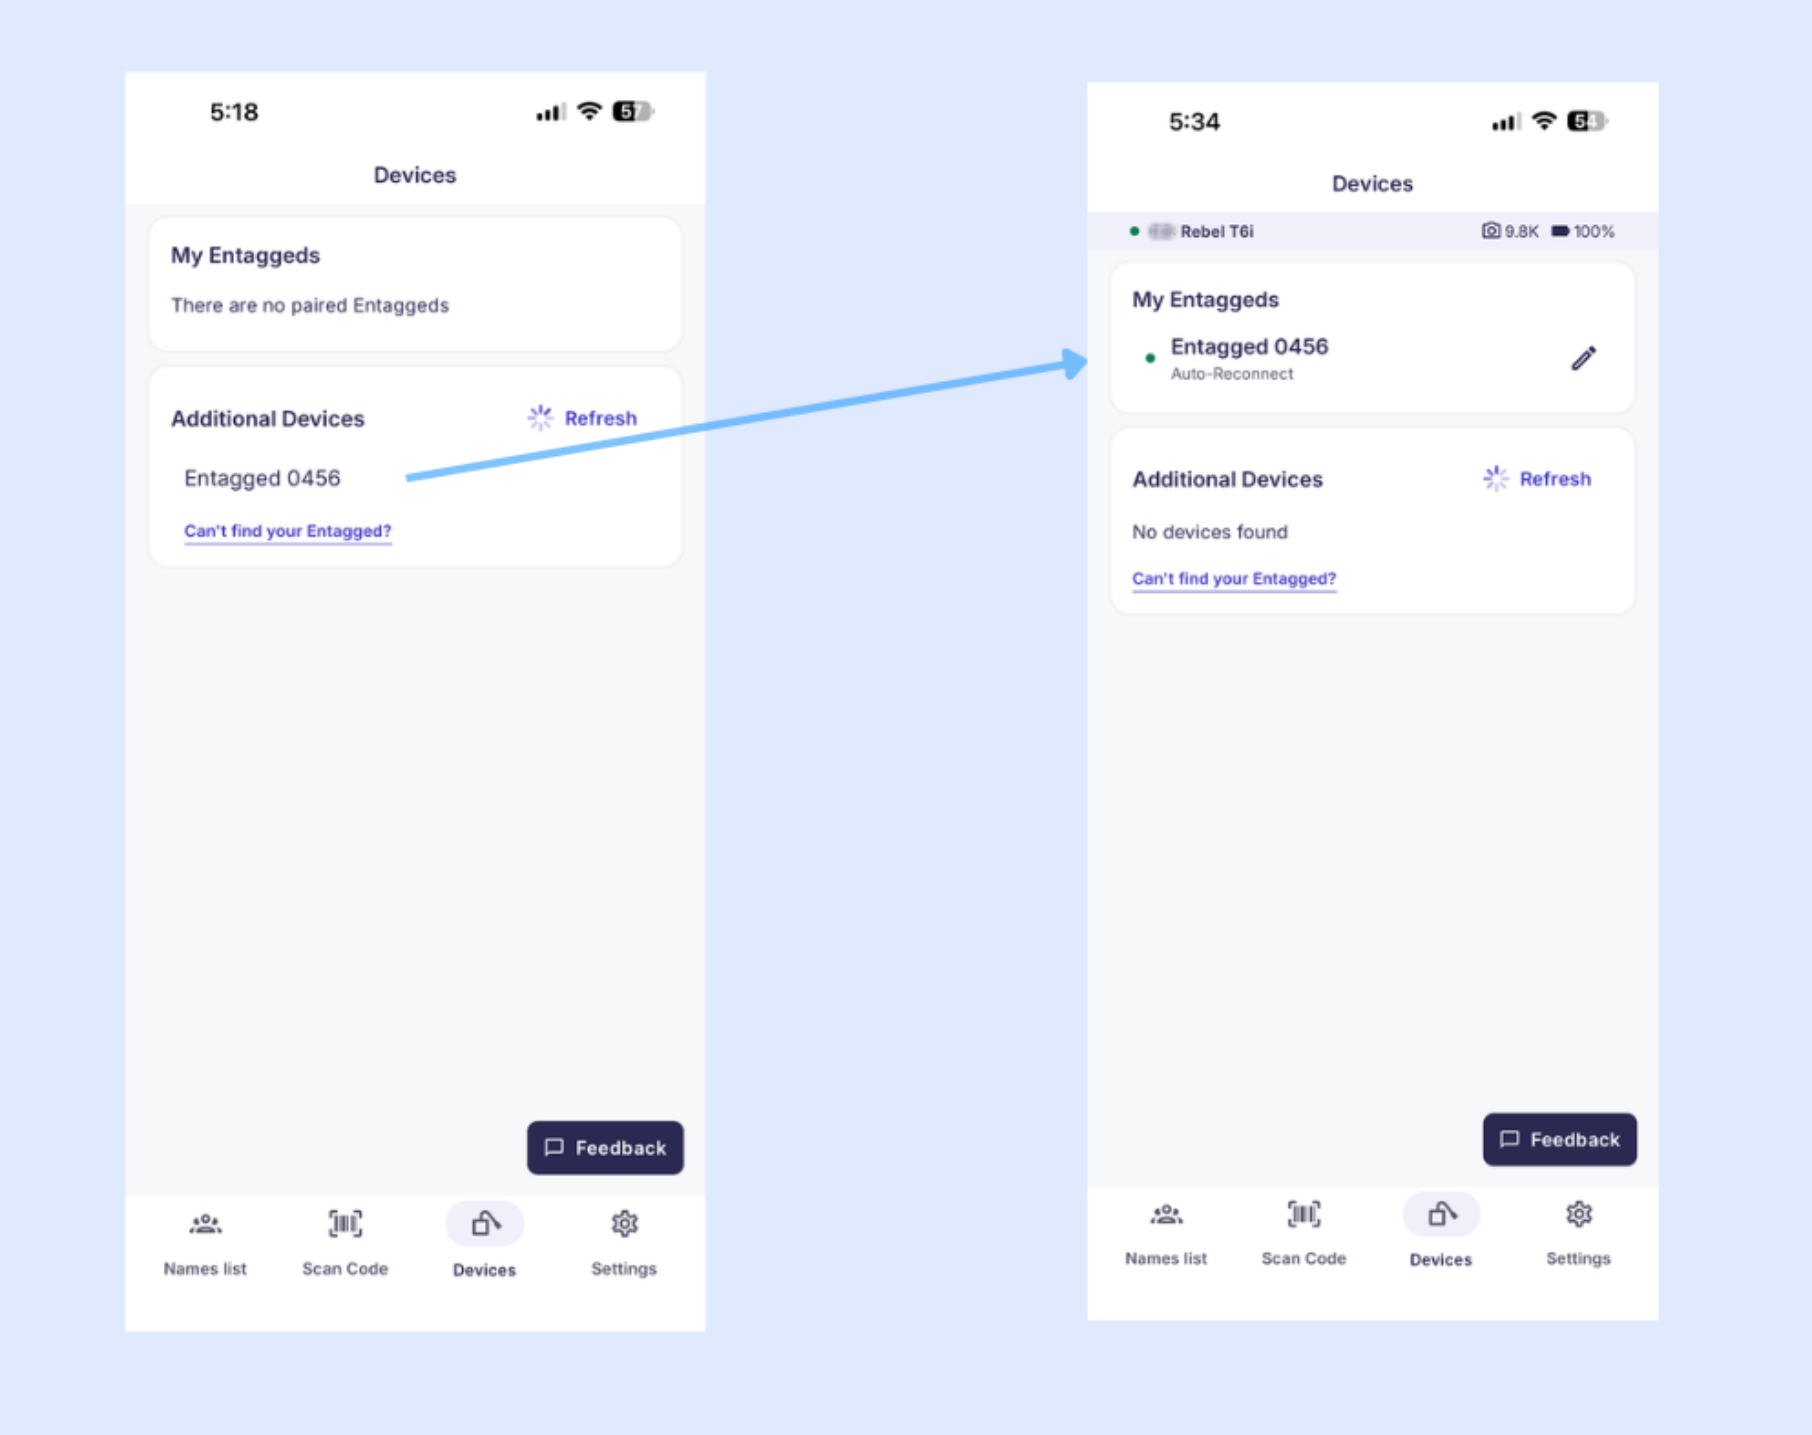
- Tap Devices in the app.
- Pair your Entagged. The process is similar to the pairing process in the Entagged app.
- Select the device under Additional Devices.
- Confirm pairing. The device will move to My Entaggeds.
If a new firmware update becomes available, you will see a notification here.
Manage your Entagged settings
You can access the Entagged settings by opening the Devices section, tapping the pencil icon next to your connected Entagged device, and then tapping the gear icon in the top-right corner.
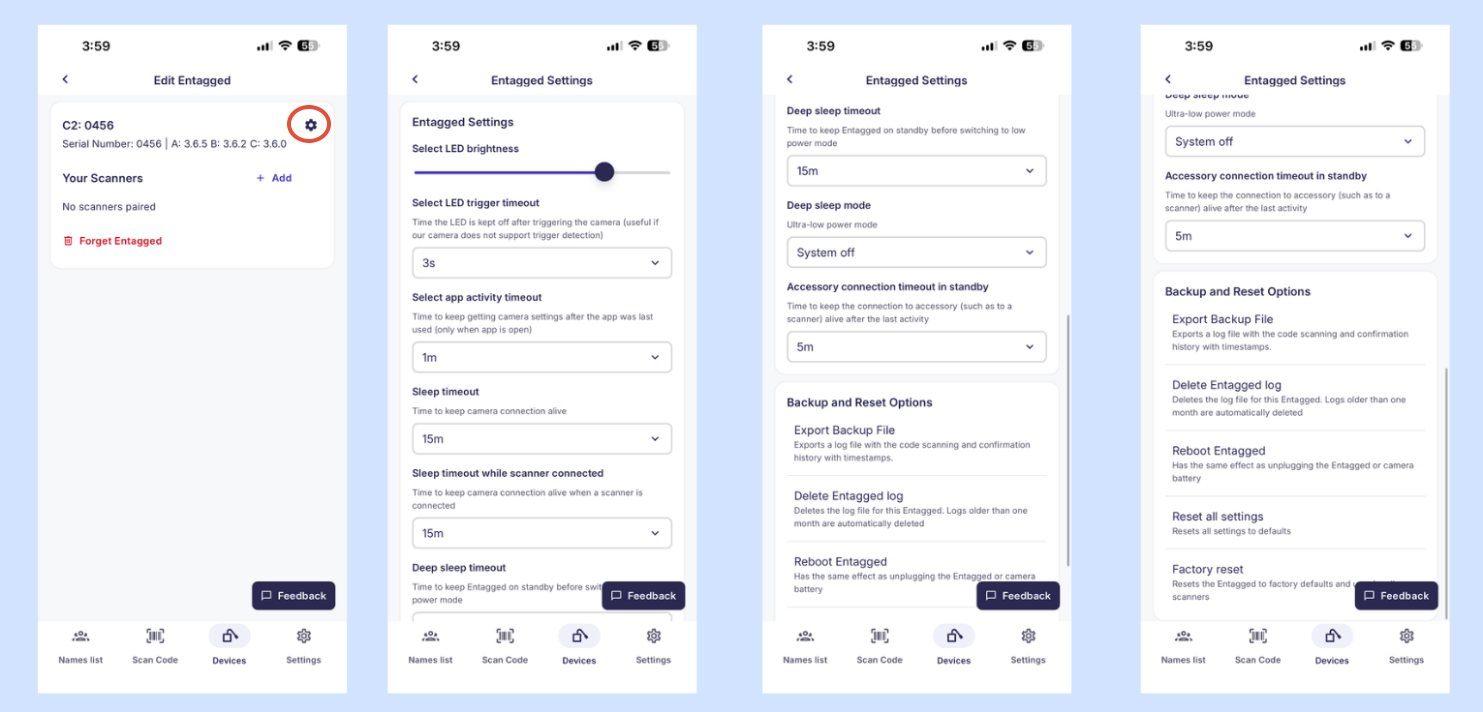
You can access the Entagged Settings by opening the Devices section, selecting your connected Entagged device, and tapping the gear icon in the top-right corner. Here you can configure various device settings, including:
- LED brightness: Adjust the brightness of the LED used to trigger the camera.
- LED trigger timeout: Set how long the LED remains active after triggering the camera. This is especially useful if your camera does not support trigger detection.
- App activity timeout: Specify how long camera settings remain available after the app was last used (while the app remains open).
- Sleep timeout, Deep sleep timeout, and Deep sleep mode: Configure when the Entagged enters standby or low-power mode to optimize battery life.
- Accessory connection timeout in standby: Define how long accessories, such as a Bluetooth scanner, remain connected while the Entagged is in standby.
- Backup and Reset Options: Export a backup file, delete the Entagged log, reboot the Entagged, reset all settings to their default values, or perform a factory reset.
In most cases, the default settings provide the best balance between performance and battery life. We recommend changing these settings only if your workflow or camera setup requires different behavior.
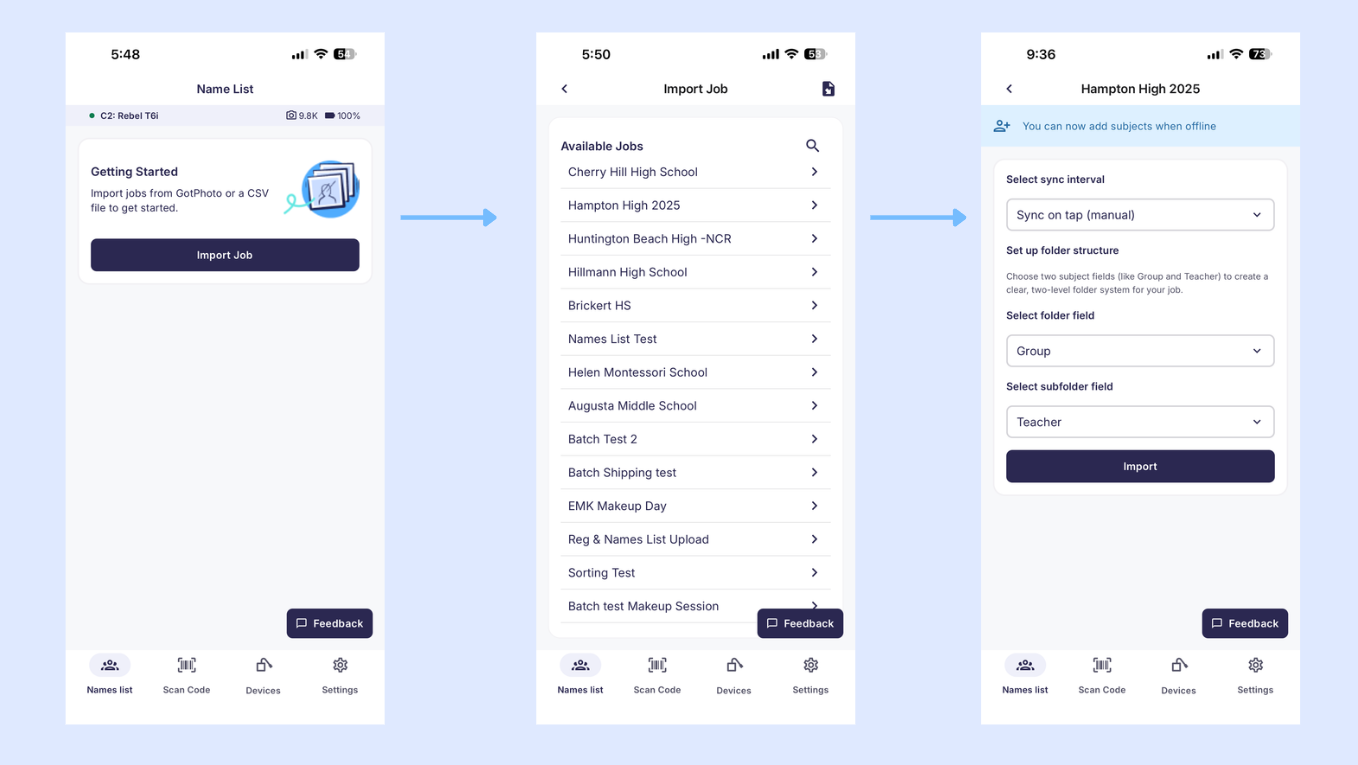
Import a Name List
Use the navigation panel to access the Name List page.
- Tap the left-most navigation button.
- Search for the job you want to import. If needed, click Show earlier jobs or use the magnifying glass to search for your job.
- Import your job’s Name List.
Follow the picture day workflow
Watch the walkthrough below to see how the workflow looks on picture day when using a physical Entagged device together with a Name List subscription.
Steps shown in the walkthrough:
- Confirm your Entagged device shows a green connection status.
- Open the Name List for the current job.
- Select the next subject on the list so they appear as “Active.”
- Scan the subject’s barcode with the Entagged device.
- Photograph the subject.
- Confirm the subject is marked “Done” in the Name List.
- Repeat for each remaining subject.
Use the Name List QR feature (no Entagged device required)
This workflow allows you to tag photos using digital QR cards directly in the app.
No physical Entagged device is required to use this feature. All you need is a GotPhoto account.
Please note: Editing and adding names to a names list requires an active Entagged Names List subscription.
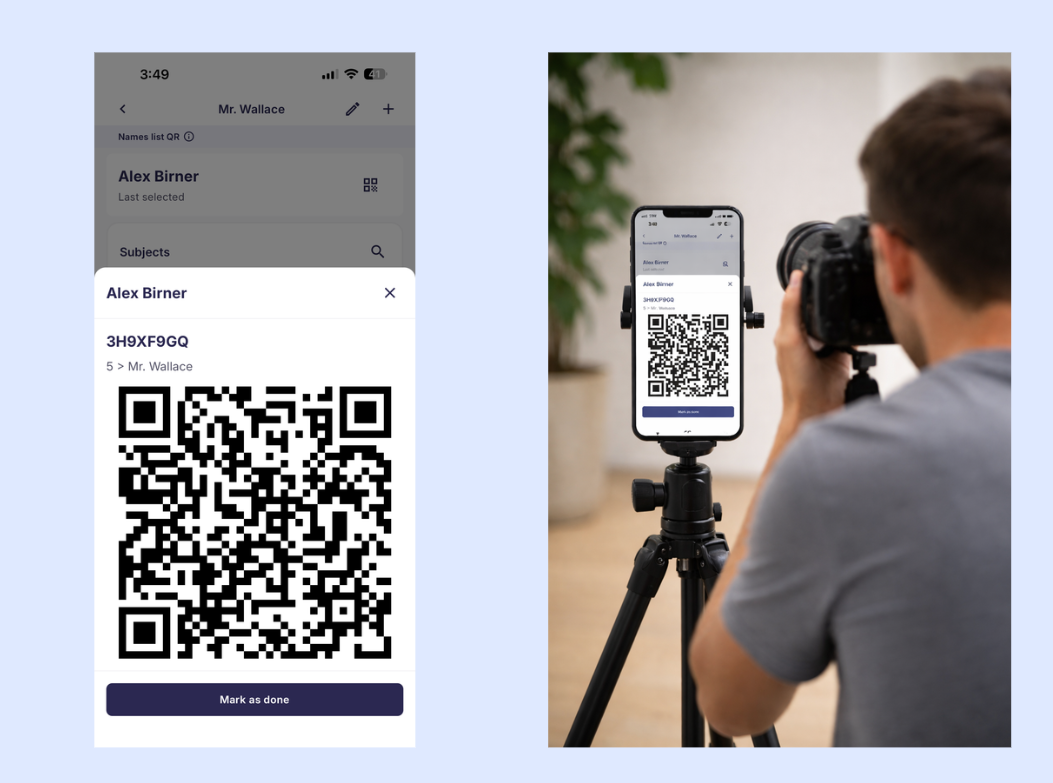
Follow the digital QR workflow
- Select a job’s Name List.
- Select a subject.
- Photograph the QR code displayed in the app.
- Take the subject’s photos.
- Repeat for the next subject.
Switch from Entagged barcode tagging to Name List QR
You can switch to Name List QR whenever your Entagged device is disconnected. This allows you to access your job’s Name List, select a subject, and photograph their digital QR code directly from the app.
Steps shown in the walkthrough:
- Notice the Entagged connection status dot turns from green to disconnected.
- The app automatically switches to the Name List QR workflow.
- Select the next subject on the Name List.
- Photograph the subject’s digital QR code shown in the app.
- Photograph the subject.
- Repeat for each remaining subject.
Important: If you switch mid-session from using the physical Entagged device to photographing digital QR codes:
- Delete the last saved code from your camera’s metadata. If you use a Sony camera, turn your camera off and on again before continuing. This removes the last saved code from your camera.
- Upload photos to separate albums.
- Upload all photos tagged using the Entagged device into one album.
- Upload all photos where you photographed digital QR codes into a different album.
Uploading both types of photos into the same album will cause activation issues.
Scan codes with Entagged
This feature requires a physical Entagged device. An additional Bluetooth scanner is optional. The app includes a built-in scanning feature.
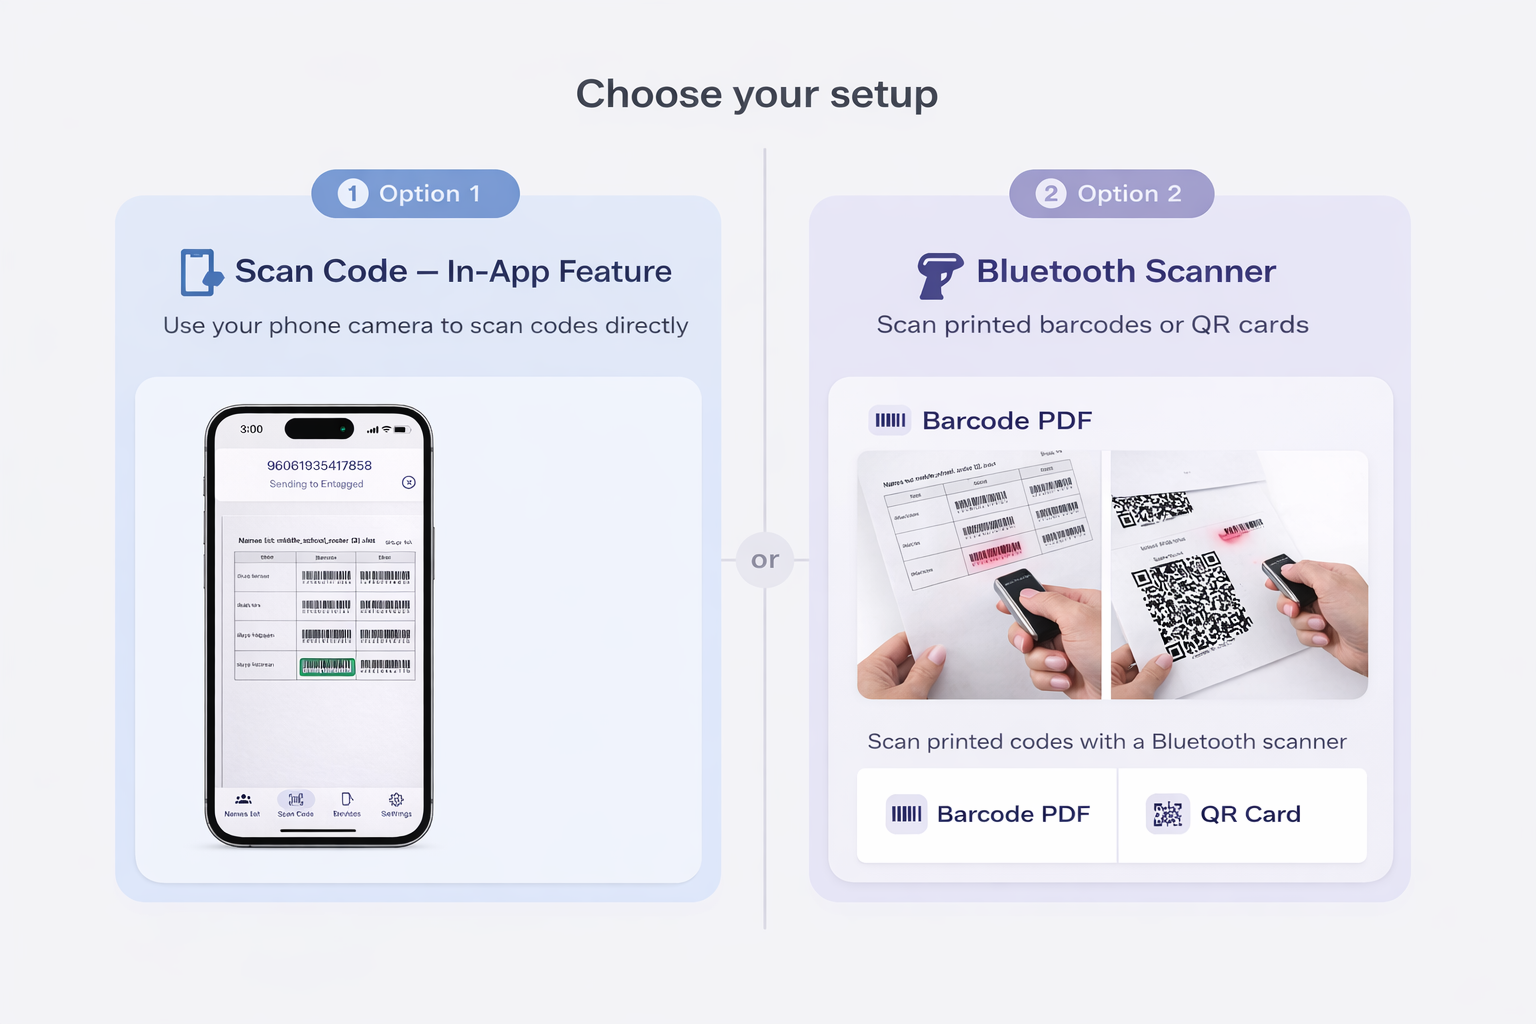
Scan a barcode
- Tap Scan code.
- Use the built-in scanner or a supported external barcode scanner.
- Confirm the scanned barcode in the app.
- Photograph the subject.
- Repeat for the next barcode.
For full job planning instructions, see the Entagged barcode scanning workflow article.
Manage devices in the Devices screen
This screen is only relevant if you use a physical Entagged device.
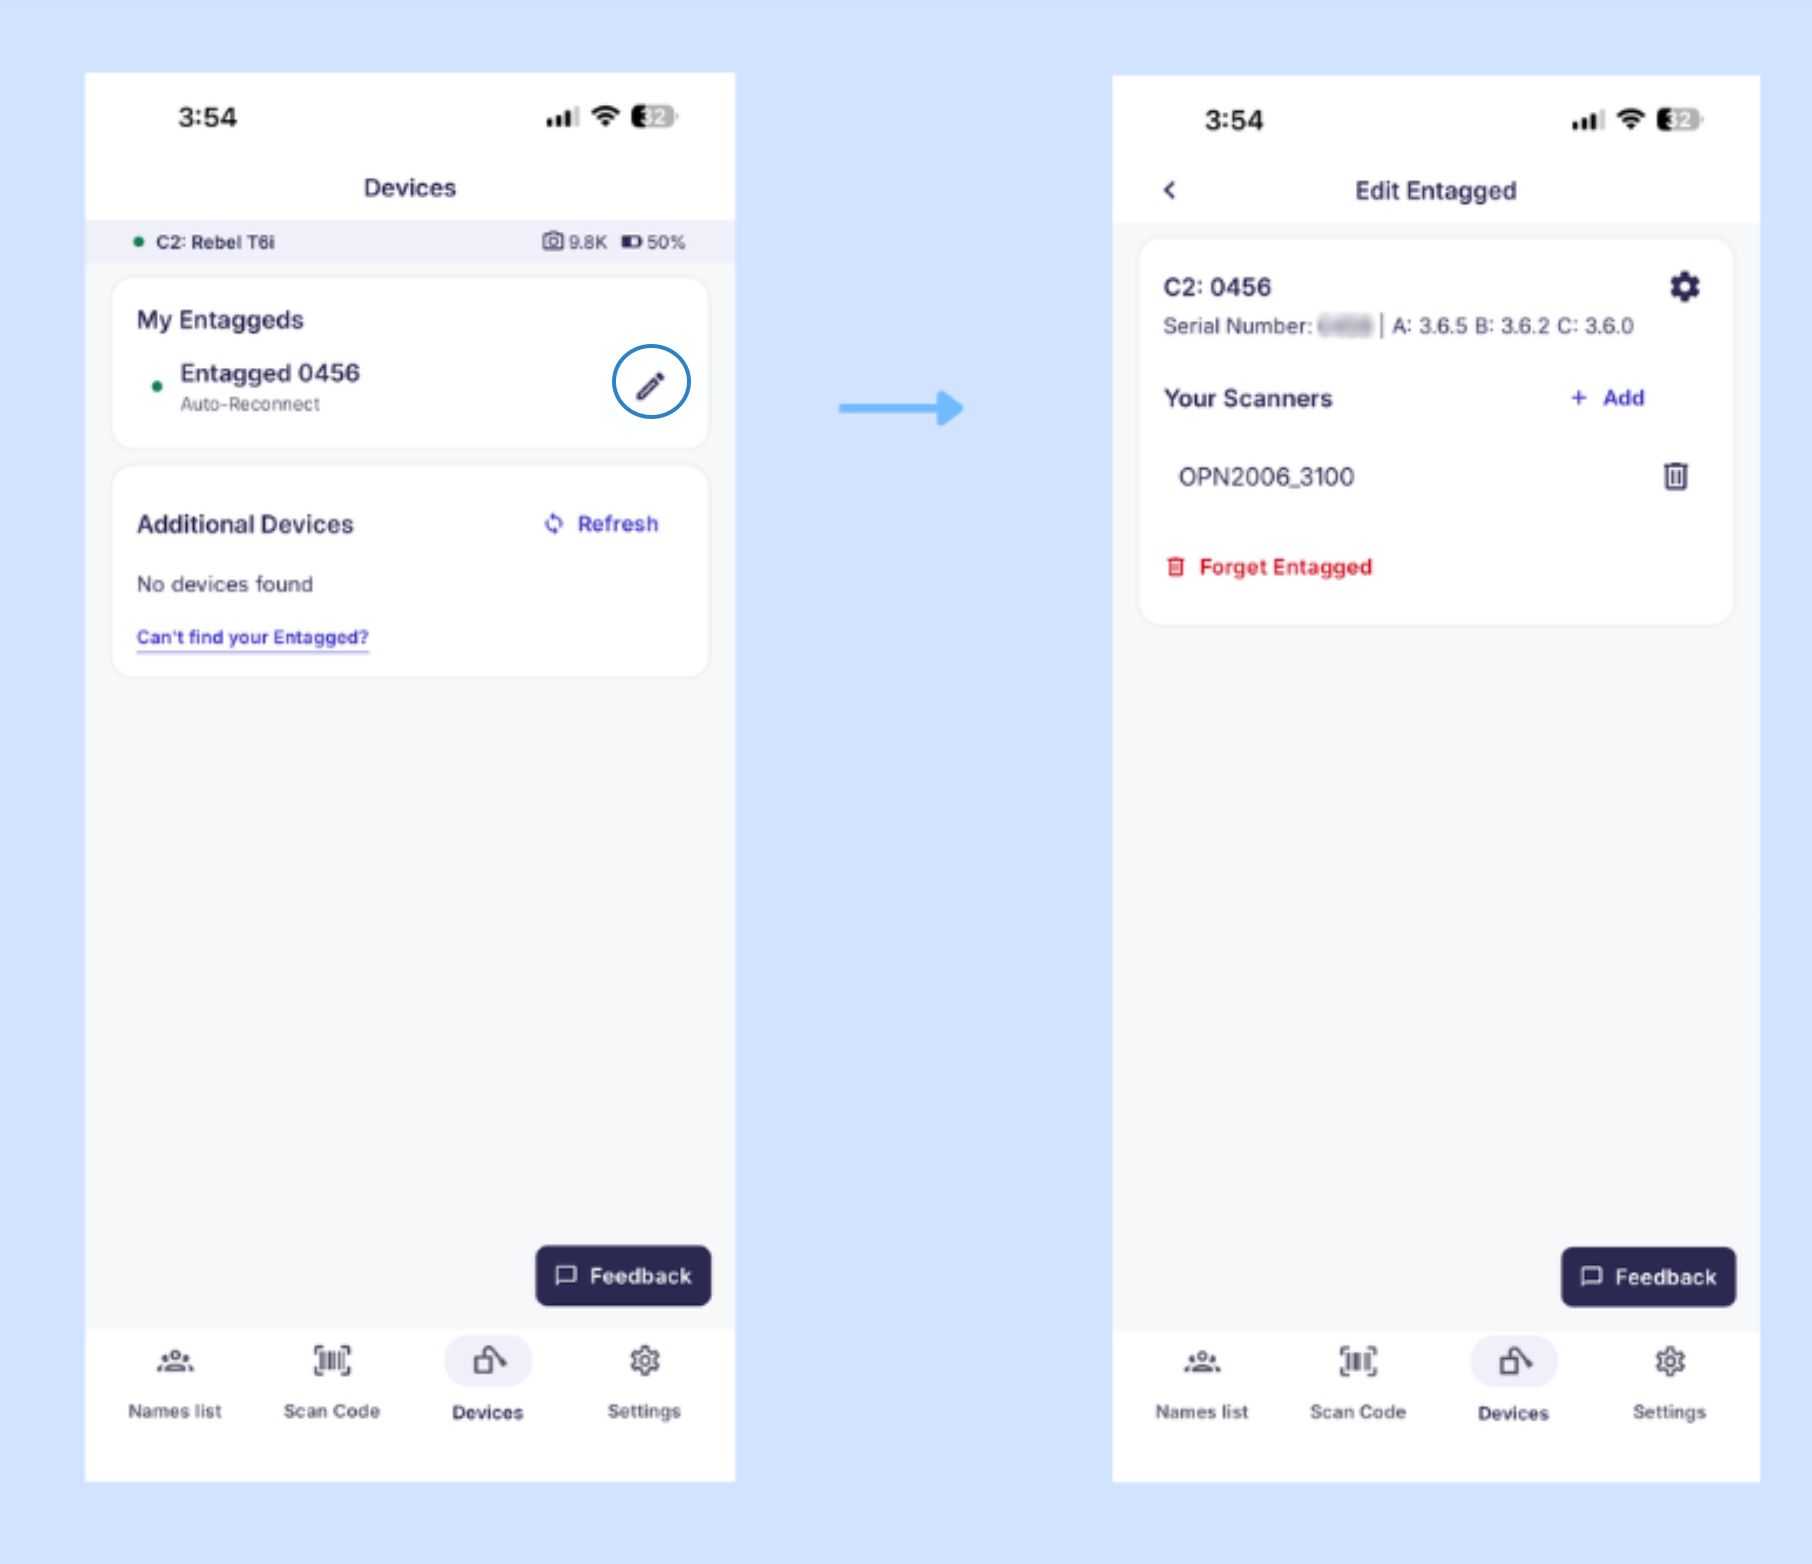
Disconnect an Entagged device
- Tap the pencil icon next to the device.
- Select Forget Entagged.
- Confirm your choice.
Reconnect an Entagged device
- Select the device under Additional Devices.
- Complete pairing.
- The device will move to My Entaggeds.
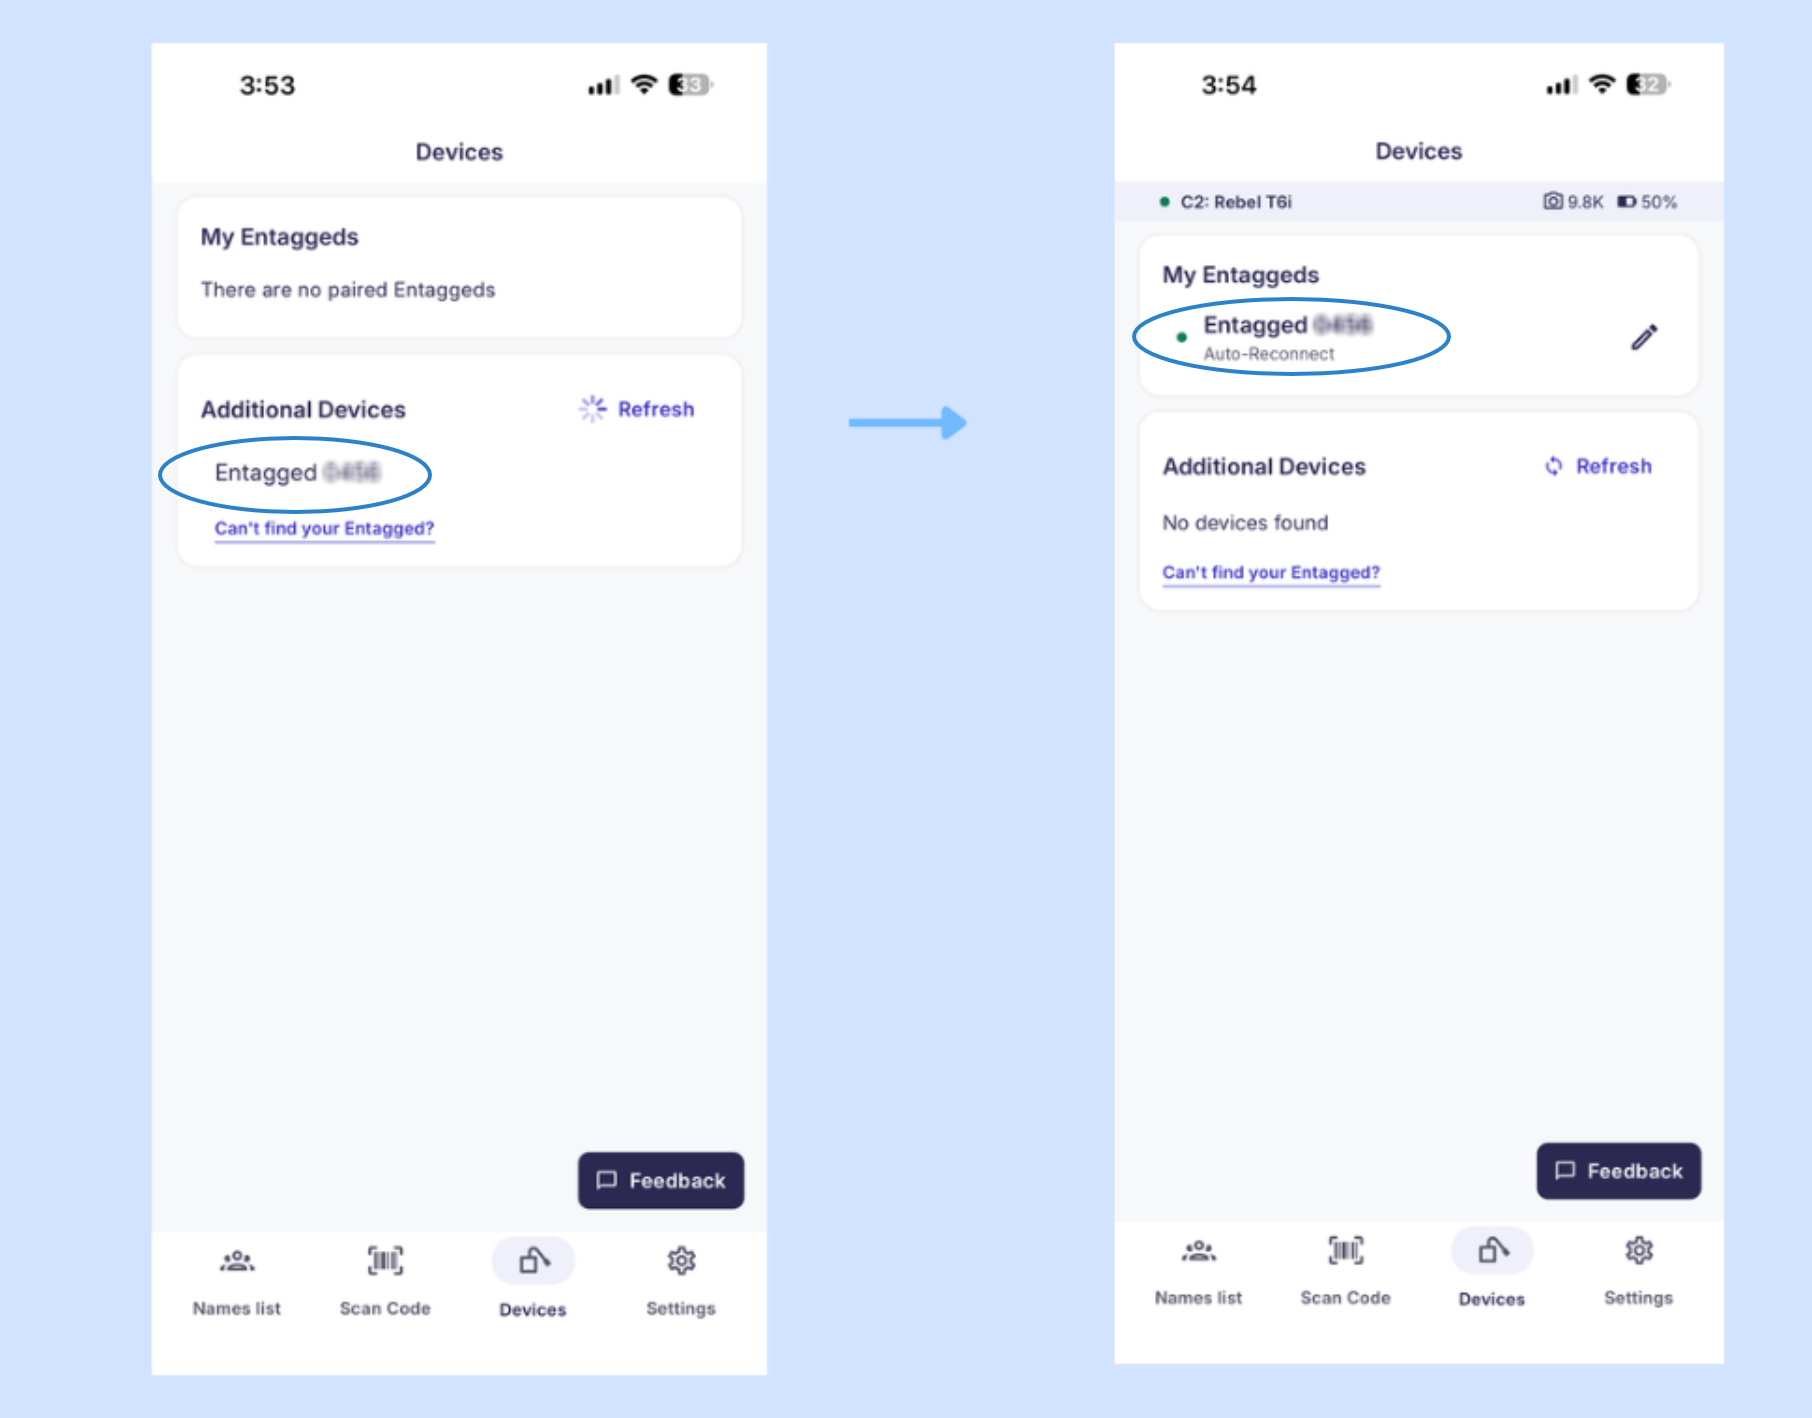
You can also connect or disconnect a Bluetooth scanner from this screen.
Manage app settings in the Settings tab
Use the Settings tab to change account and tagging preferences and access help resources.
Tagging settings
- Change the sorting of your Name List.
- Choose whether names are displayed starting with the first or last name.
- Manage help notes and warnings in the app
- Choose your preferred tagging code type. By default, the app uses the Access Code tagging type, alternatively, you can choose the Barcode tagging type.
⚠️ Important when using custom access codes: Always choose the Barcode tagging type if you use custom access codes shorter than 8 characters or contain special characters.The GotPhoto app strictly requires access codes to be at least 8 characters and contain only letters and numbers. If your custom access codes are shorter than 8 characters or contain any symbols, selecting the barcode tagging option ensures your galleries activate without issues. Otherwise, your galleries won't activate.
- Enable manual barcode entry (This feature of the Scan Code mode will likely be deprecated in a future version, as GotPhoto does not support custom barcodes; we don't recommend using it).
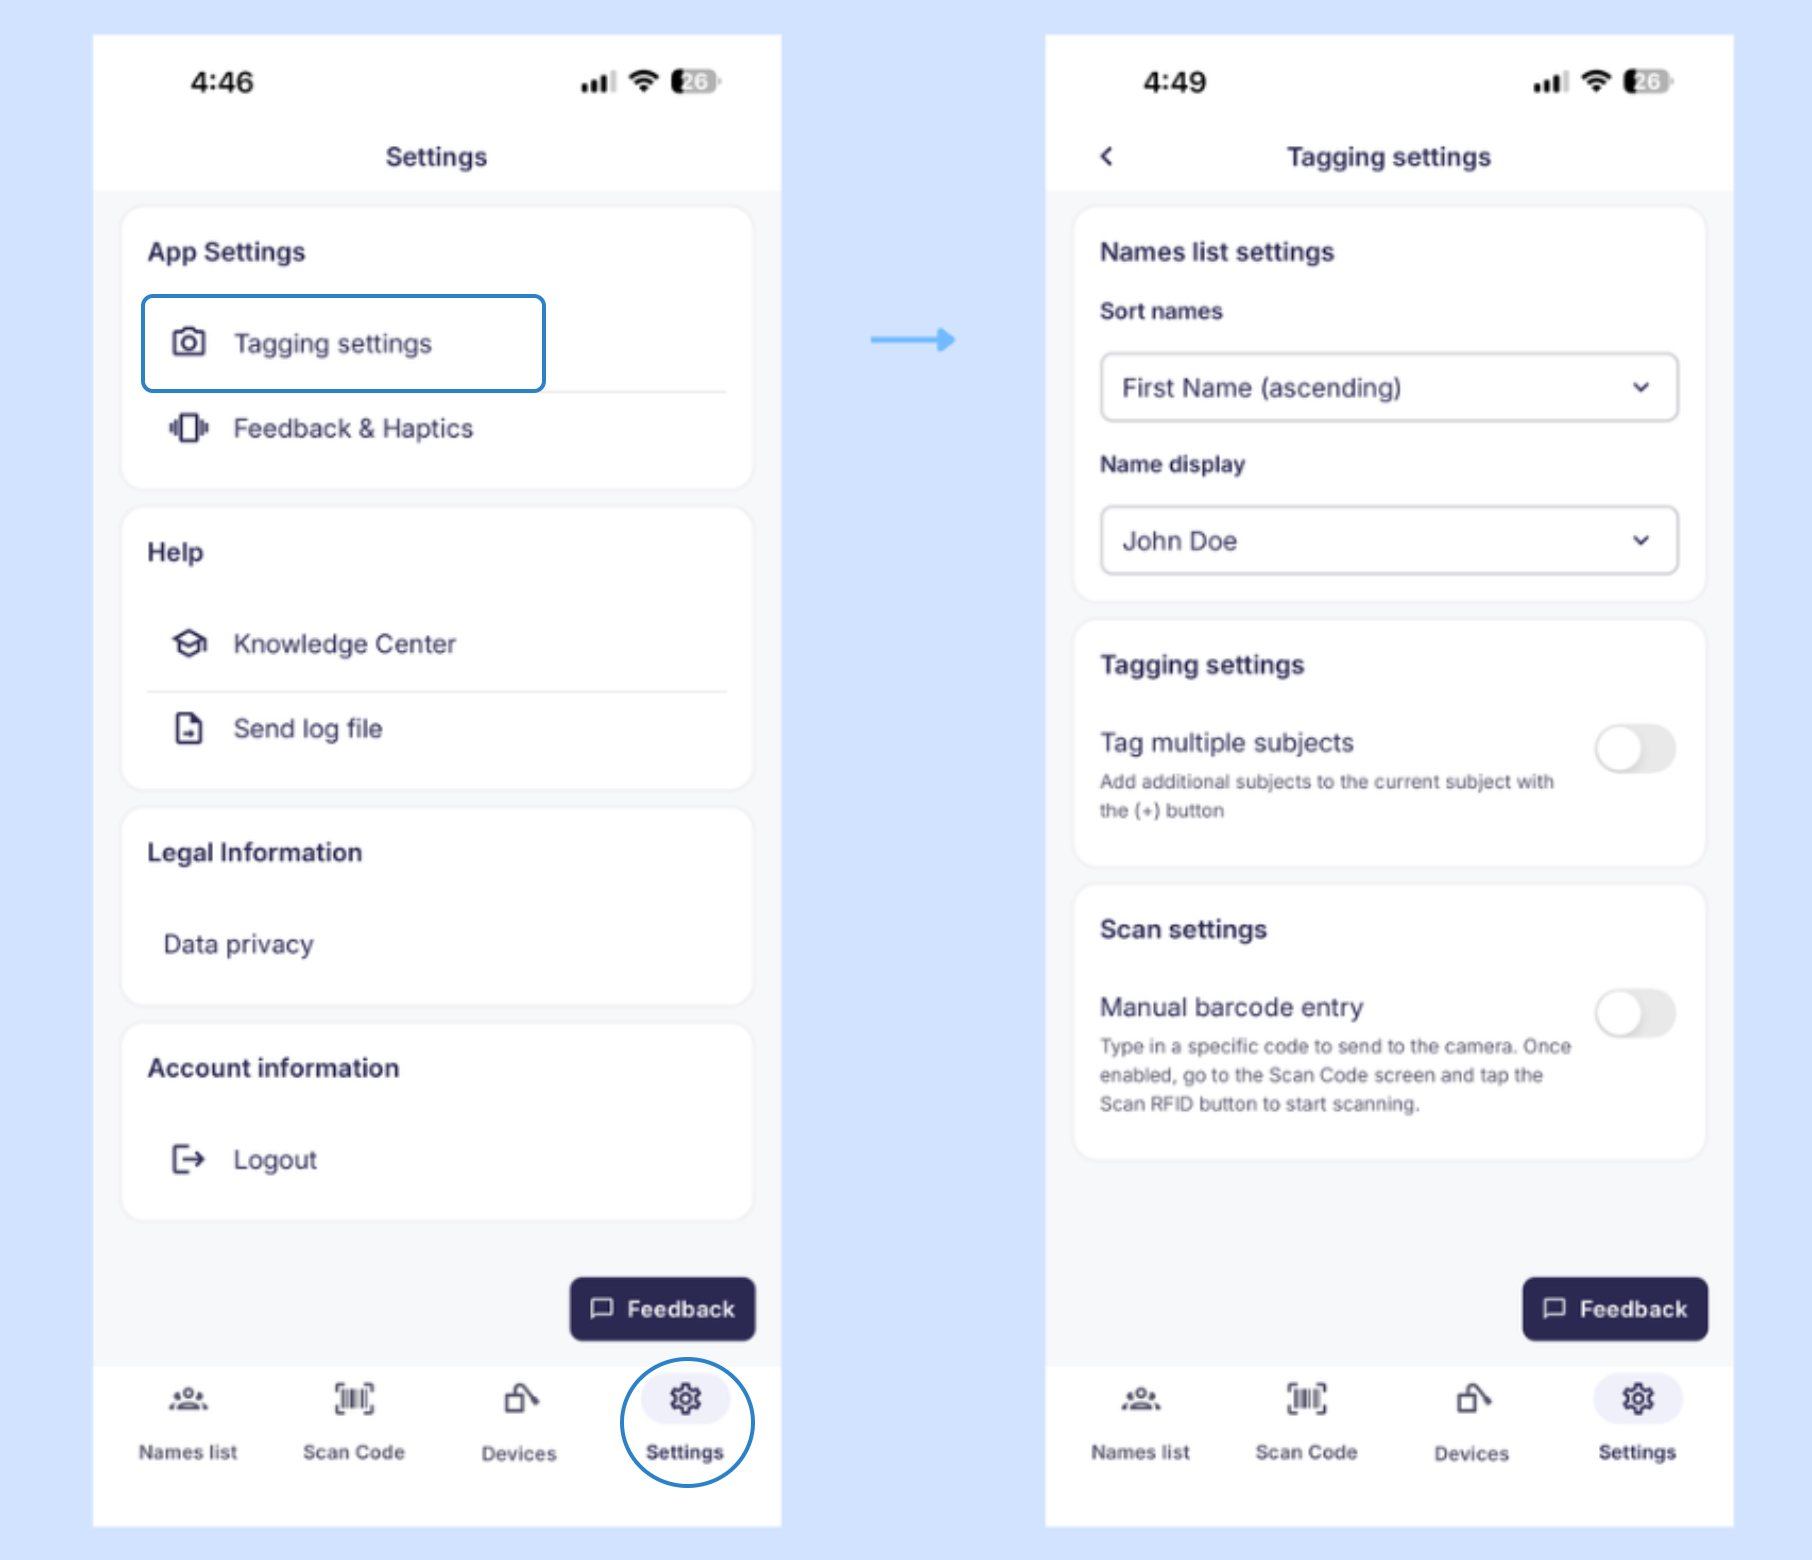
Other settings
- Feedback and Haptics: Manage Haptics & Vibration and Sound Feedback.
- Analytics: Share anonymous usage data with us to improve the app.
- Knowledge Center: Access the Entagged Help Center. GotPhoto app documentation is being added as new features are released.
- Send log file: Not available yet. This feature will allow you to share a diagnostic report with the support team.
- Legal information: Access the GotPhoto App's Data Privacy Notice.
- Account information: Access your GotPhoto login screen and log out of your account.
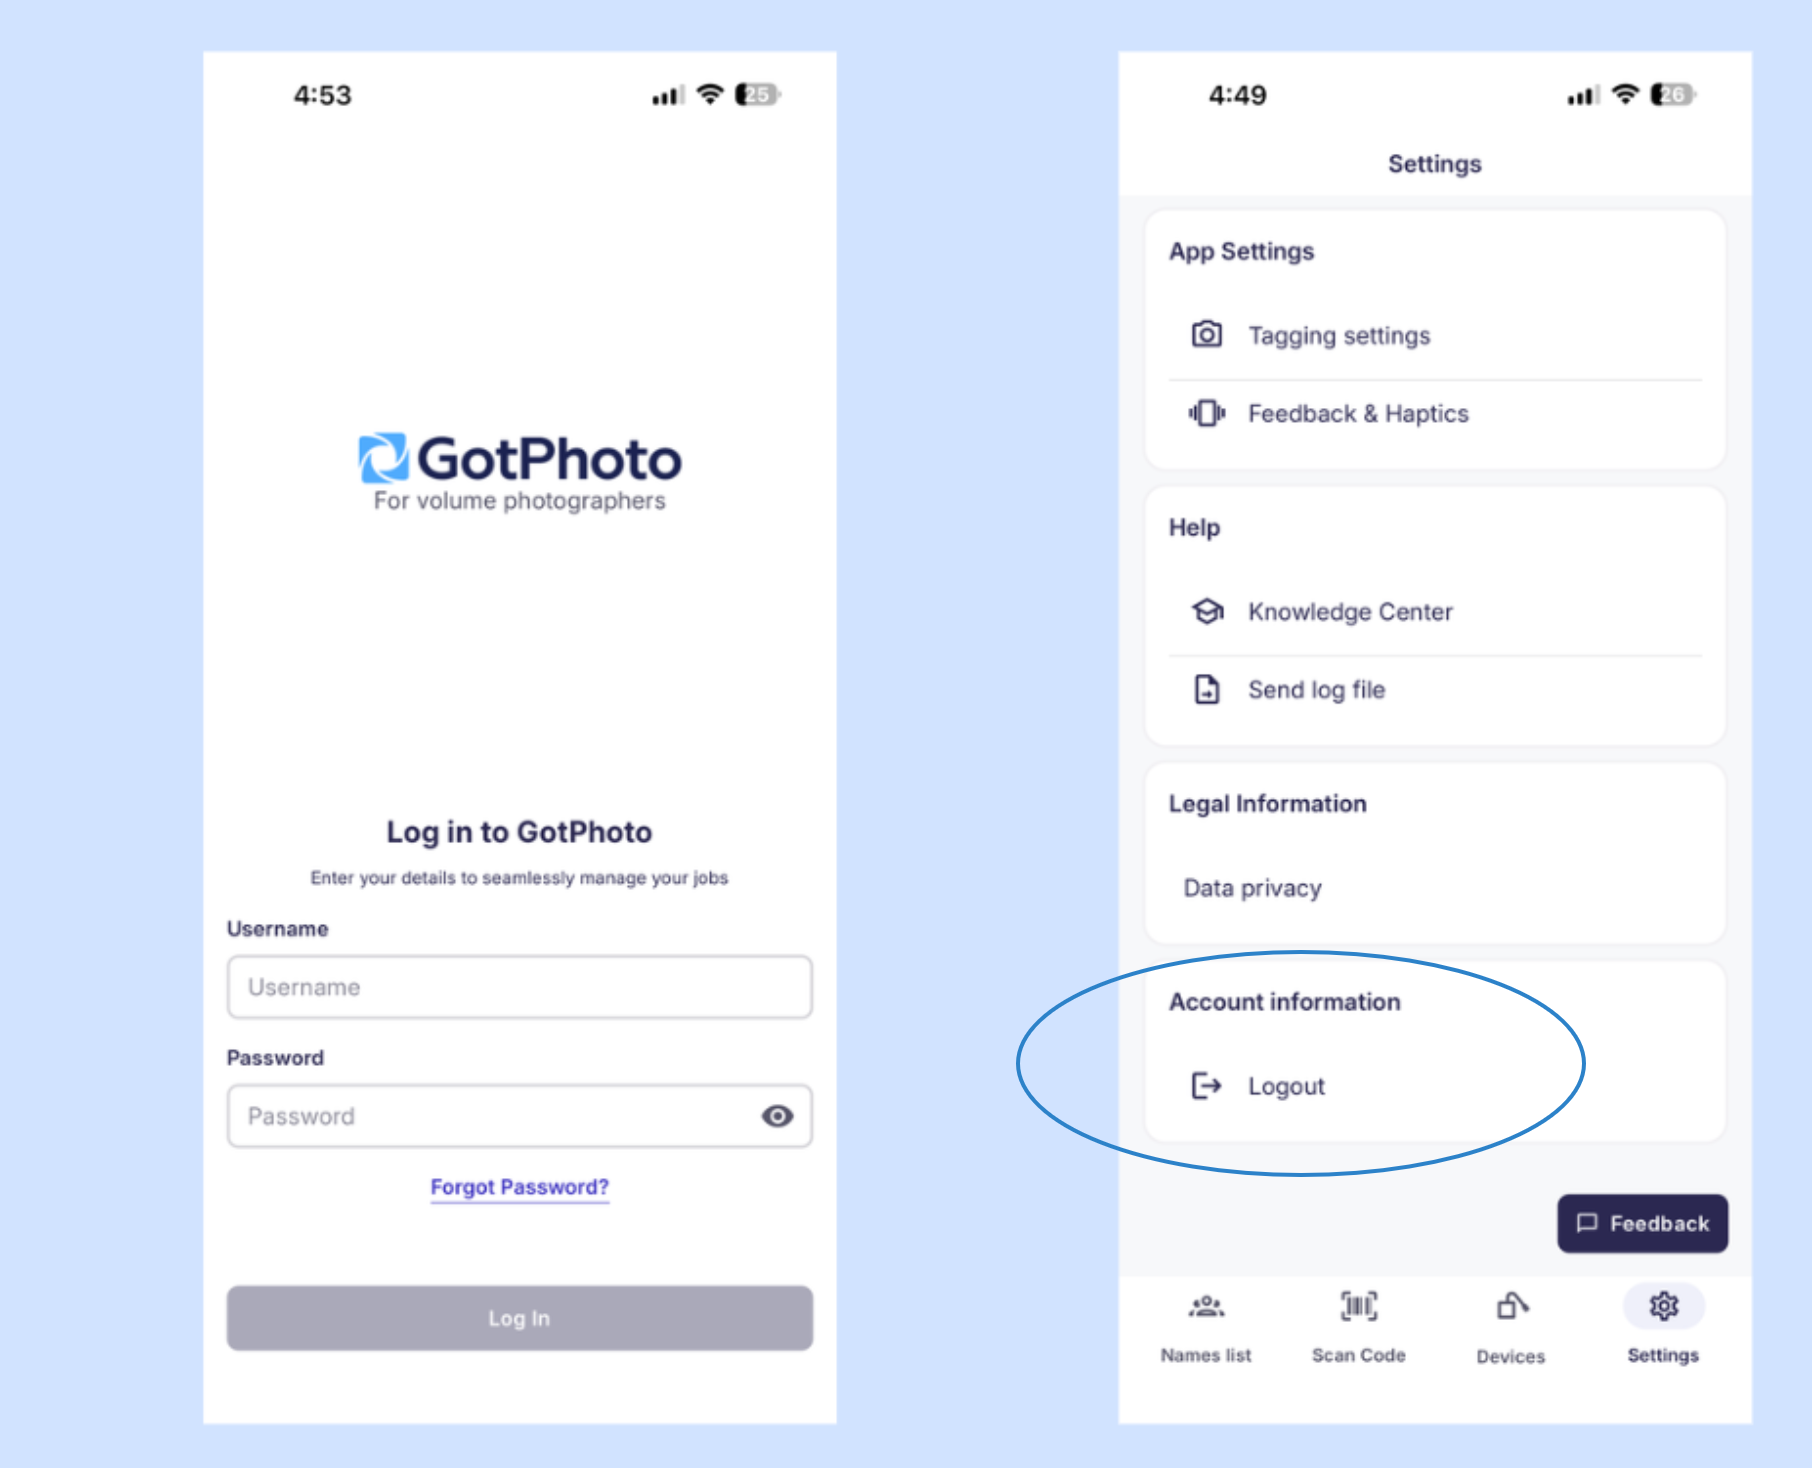
Understand the device status bar
At the top of the Name List and Scan code screens, a colored dot indicates the connection status of the Entagged device:
- Green: Entagged is connected.
- Yellow: Entagged is initializing and establishing a connection.
- If the Entagged is disconnected, the system switches automatically to the Name List QR feature.
Graphic below: Connection status indicators
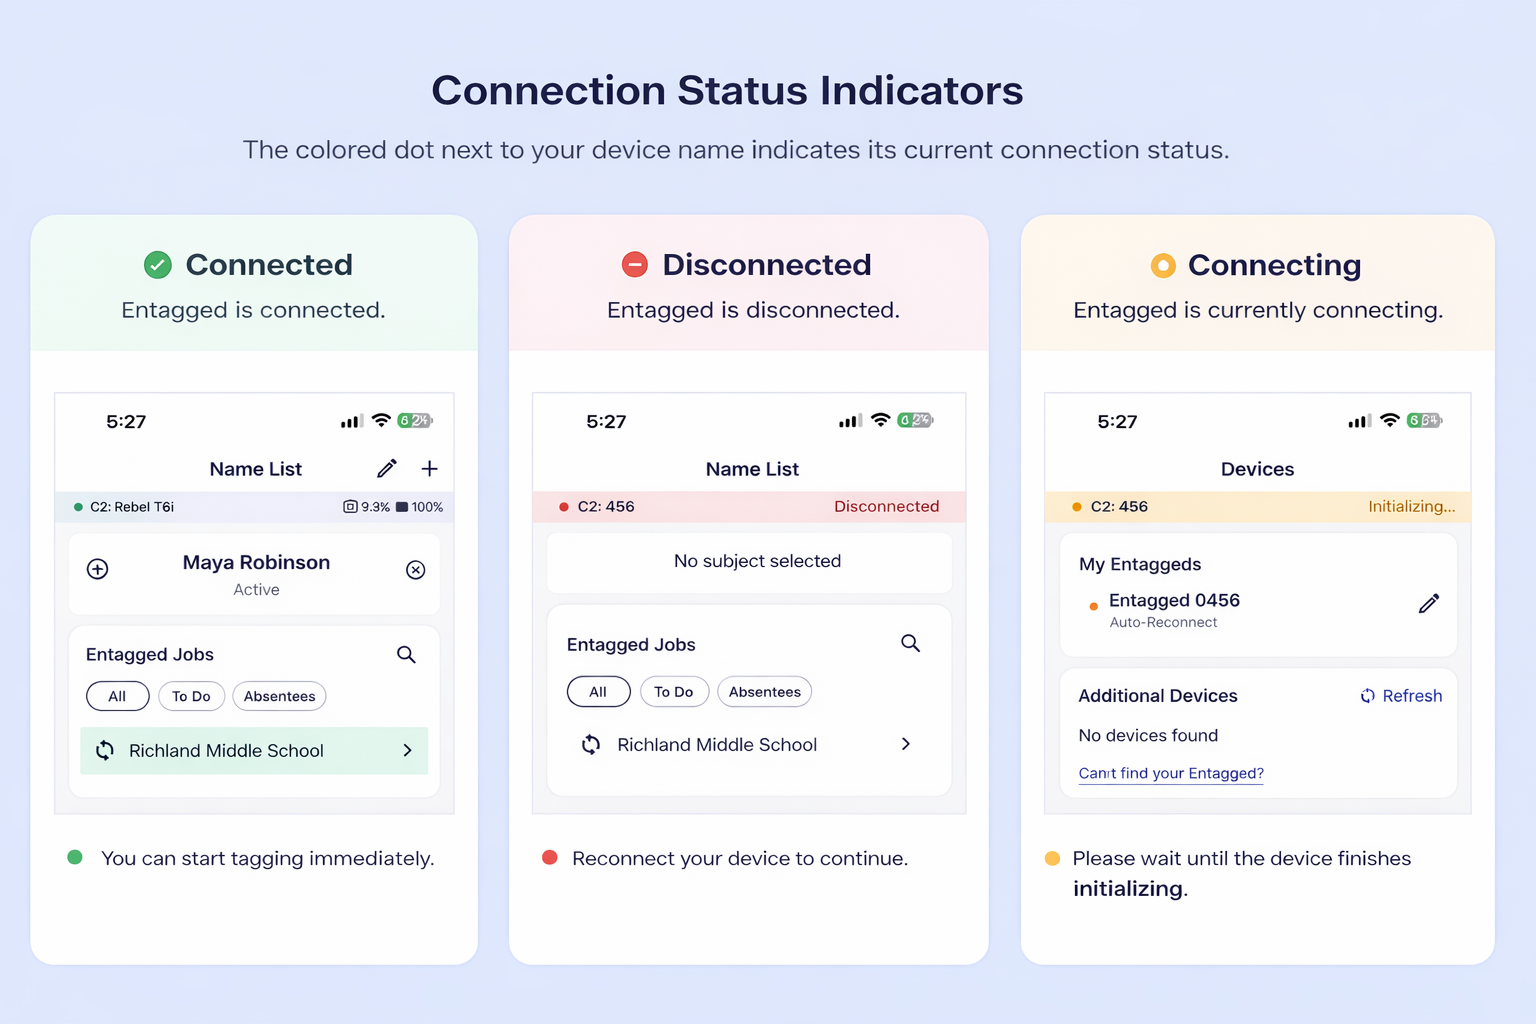
Next to the status dot, you will see the Entagged model and either the serial number (while connecting) or the camera model name (once fully connected). On the right side, you will find the SD card storage indicator and camera battery level.
Your filter options in the GotPhoto app
With the filtering options in the GotPhoto app, you can easily manage subject lists and complex picture day setups.
Filters help you quickly identify the tagging status in the app:
- "All": Displays all subjects in the job, regardless of their tagging status.
- Tap "To Do": The filter changes to "To do only" and displays only untagged subjects.
- Tap "To Do Only": The filter changes to "Done only" and displays only tagged subjects.
- Tap "Done only": This resets the filter back to "All".
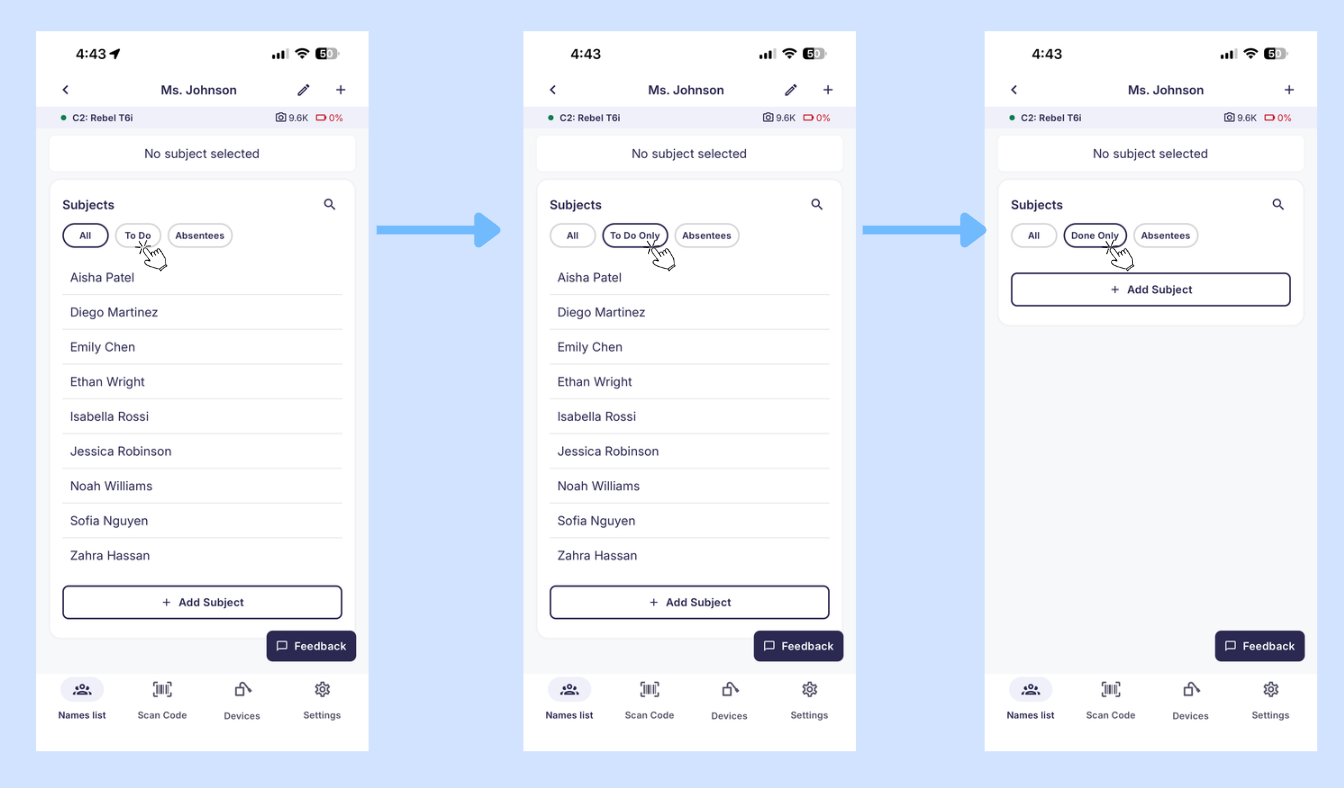
Note: If all devices running the app are connected to the internet, the Done status syncs automatically across devices.
The filters also help you identify photo availability for the corresponding job, for example "Absentees" and "Retakes", especially when working across multiple sessions or makeup days (US/CA).
Here's how to use these filters:
- Absentees: [Optional] Ideal for Makeup Day jobs, but usable in any job. Tap once to show subjects with no uploaded photos in GotPhoto. The filter will display “Absentees only.”
- Tap again to show only subjects who already have uploaded photos. The filter will display “Retakes only” for retakes or additional pictures.
- Tap a third time to remove all filters. The filter will display “All.”
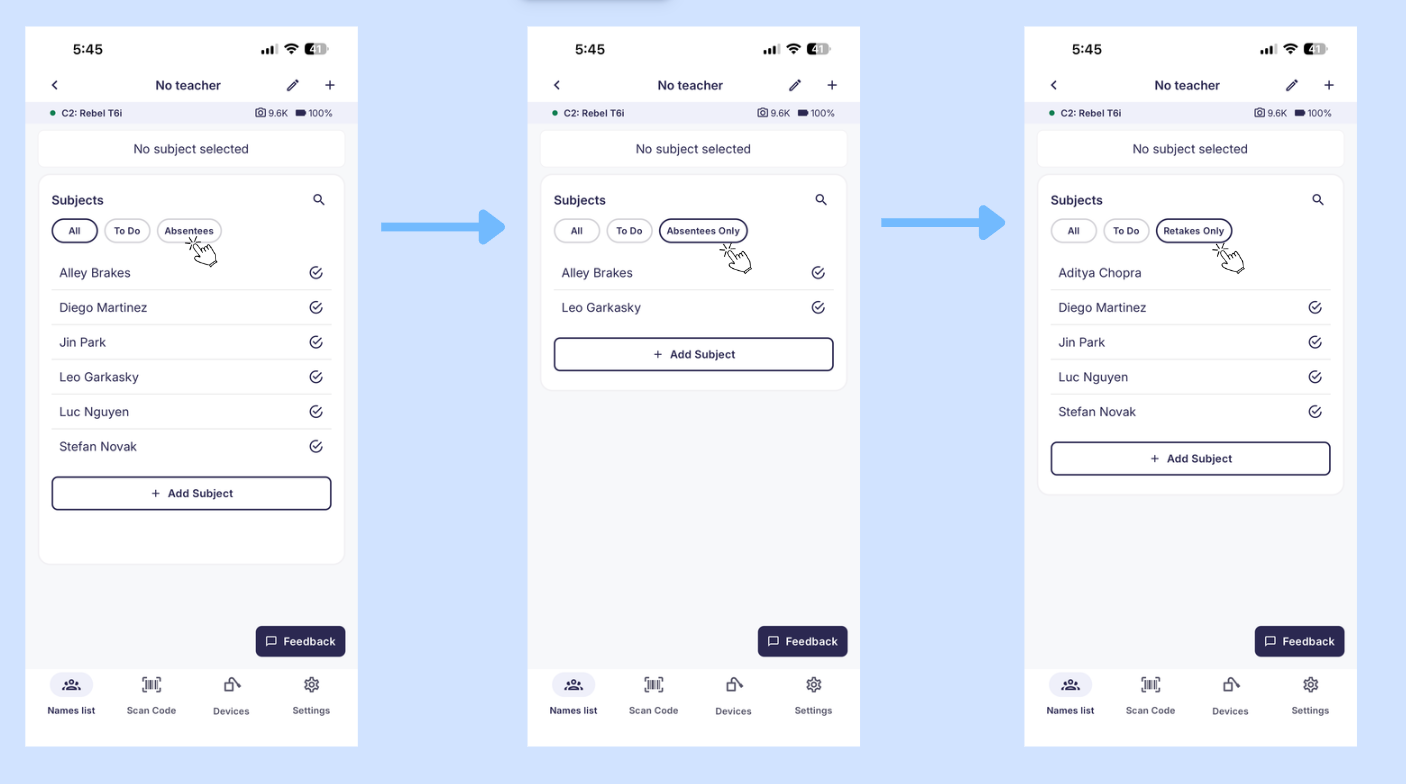
This dynamic filtering helps you quickly focus on the right group, whether you are managing absentees or staying organized across multi-day shoots.
Multi-tagging subjects when using an Entagged device
Multi-tagging lets you tag more than one subject in a single photo - for example, siblings or buddies who are photographed together. To fit as many subjects as possible in one photo, we recommend keeping the default tagging settings and using the access code to tag photos (Settings > Tagging Settings > Tagging code type > Access code). Access codes are shorter than barcodes, so more of them fit in a photo’s metadata.
To start multi-tagging:
- Select the first subject so it appears as “Active” in the selection field.
- Swipe the selection field to the right and tap “To Multi-tagging” to begin adding more subjects.
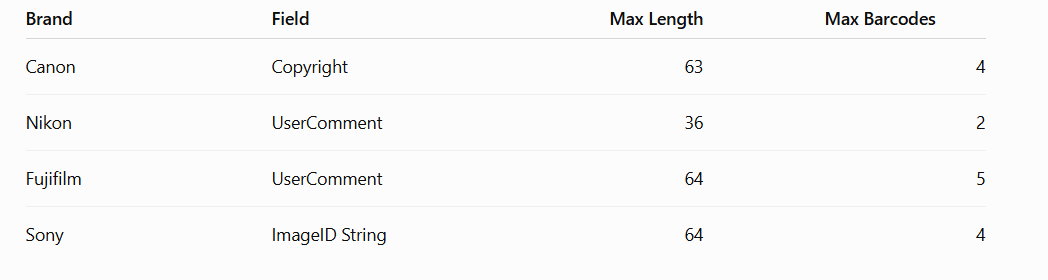
The number of people you can tag in a single photo depends on your camera model and the tagging code used (access code or barcode). Because access codes are shorter than barcodes, you can use them to tag more people per photo.
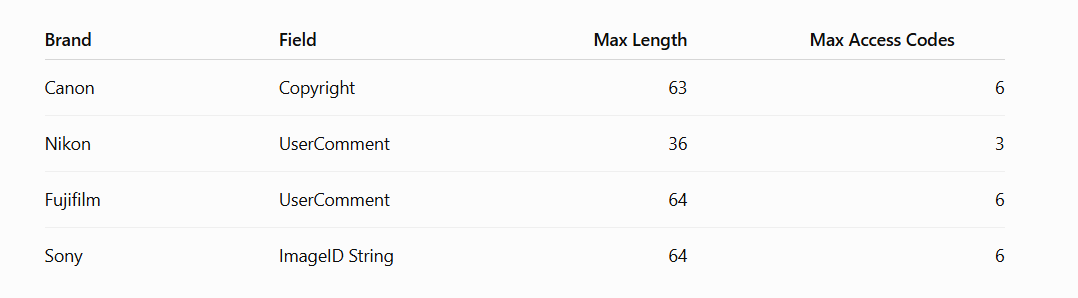
The following table shows the current maximum limits by camera manufacturer when using access codes.
- Please note that the stated values apply to system-generated access codes, which are eight characters long by default.
- If you import your own access codes, their length may vary. As a result, the maximum number of access codes, or subjects, that can be stored per photo may also change accordingly.
The example below shows the metadata written to a Canon camera when the maximum number of subjects is tagged. The access codes are listed after the text “Code=” and separated by commas, which is why the number of codes that fit in the metadata is limited.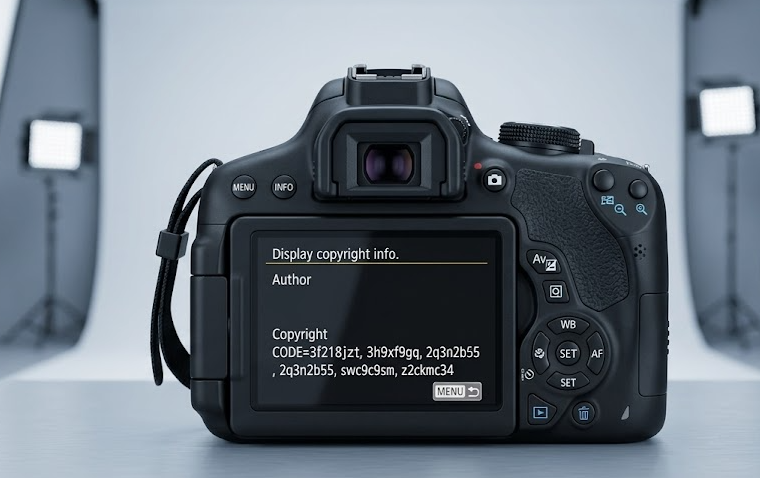
If you prefer to tag subjects using the longer barcode instead, the barcode limits per camera type are shown below:
The multi-tagging workflow:
- Select the additional subjects. If needed, remove a subject you selected accidentally by tapping the cross icon.
- In case you reach the limit of accepted codes for your camera, you will see the warning: “Subject limit reached". Adding more subjects is no longer possible.
- Take the buddy or siblings' pictures.
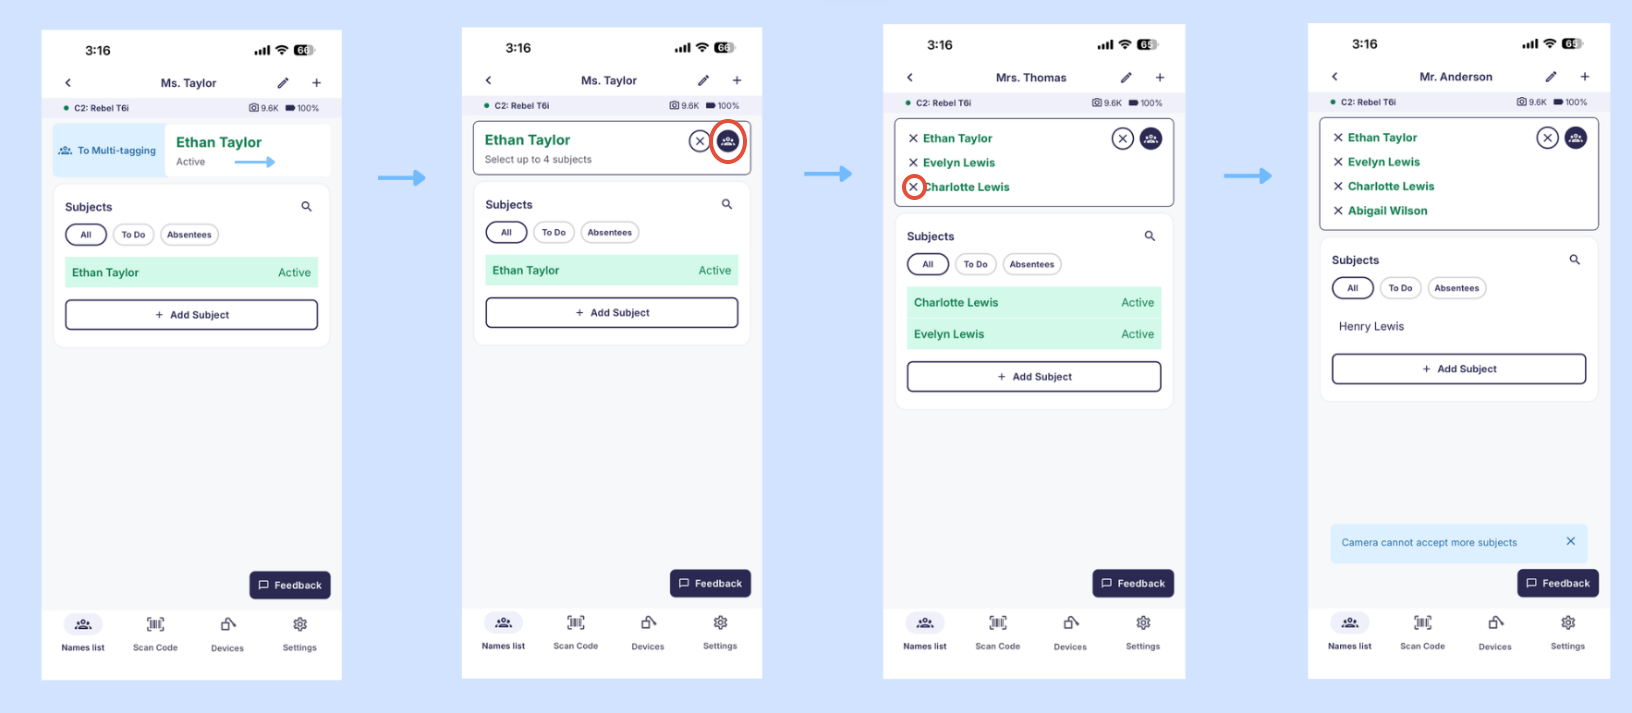
A message will indicate whether you reached the subject limit.
To switch back to single-subject tagging:
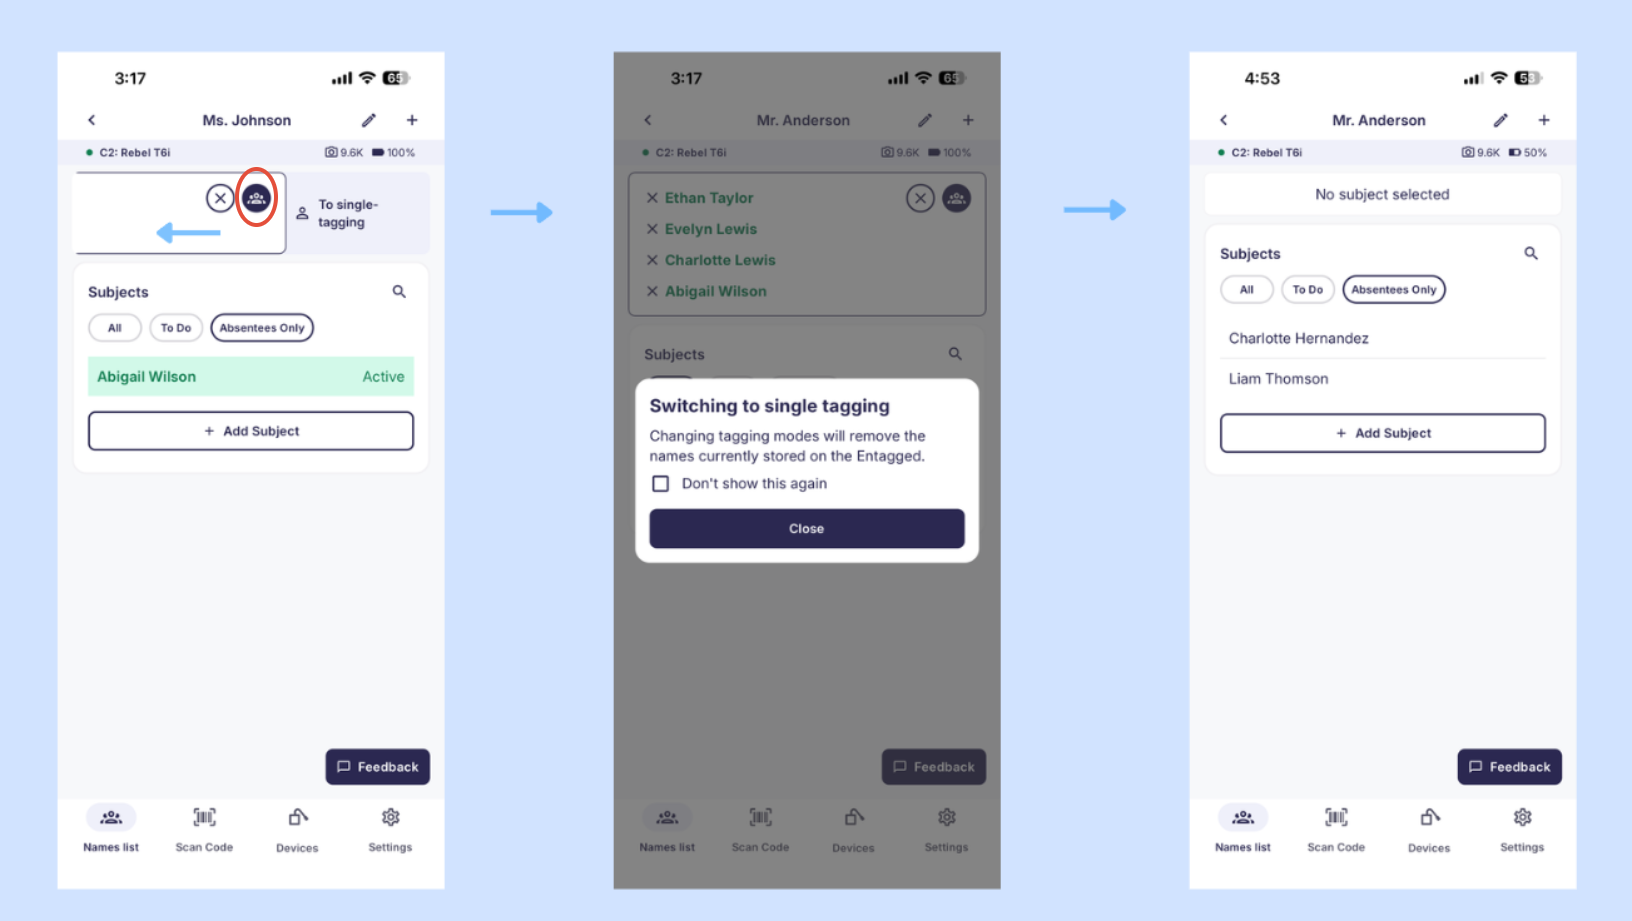
- Swipe the selection field to the left or tap the group icon.
- A confirmation message will appear, informing you that you are switching to single-subject tagging.
- (Optional) Select “Don’t show this again” if you no longer want to see this message. You can reactivate these help messages at any time in your app's tagging settings.
- Close the window.
You can now continue tagging the next subject.
FAQs
I'm using the Names List QR workflow. Why is the option to add or edit names grayed out?
Adding and editing names requires an active Names List subscription. If the option is grayed out, check whether your subscription is active. If you don't have a Names List subscription or it has expired, you'll need to activate or renew it to use this feature.
Where can I buy an Entagged device?
You can order an Entagged device here: UK / US & CA
Do I need to create spare entries in the names list that I upload to GotPhoto?
No. You don’t need to create spare entries in advance:
- As long as you are online during the photo shoot, you can add unlimited additional subjects.
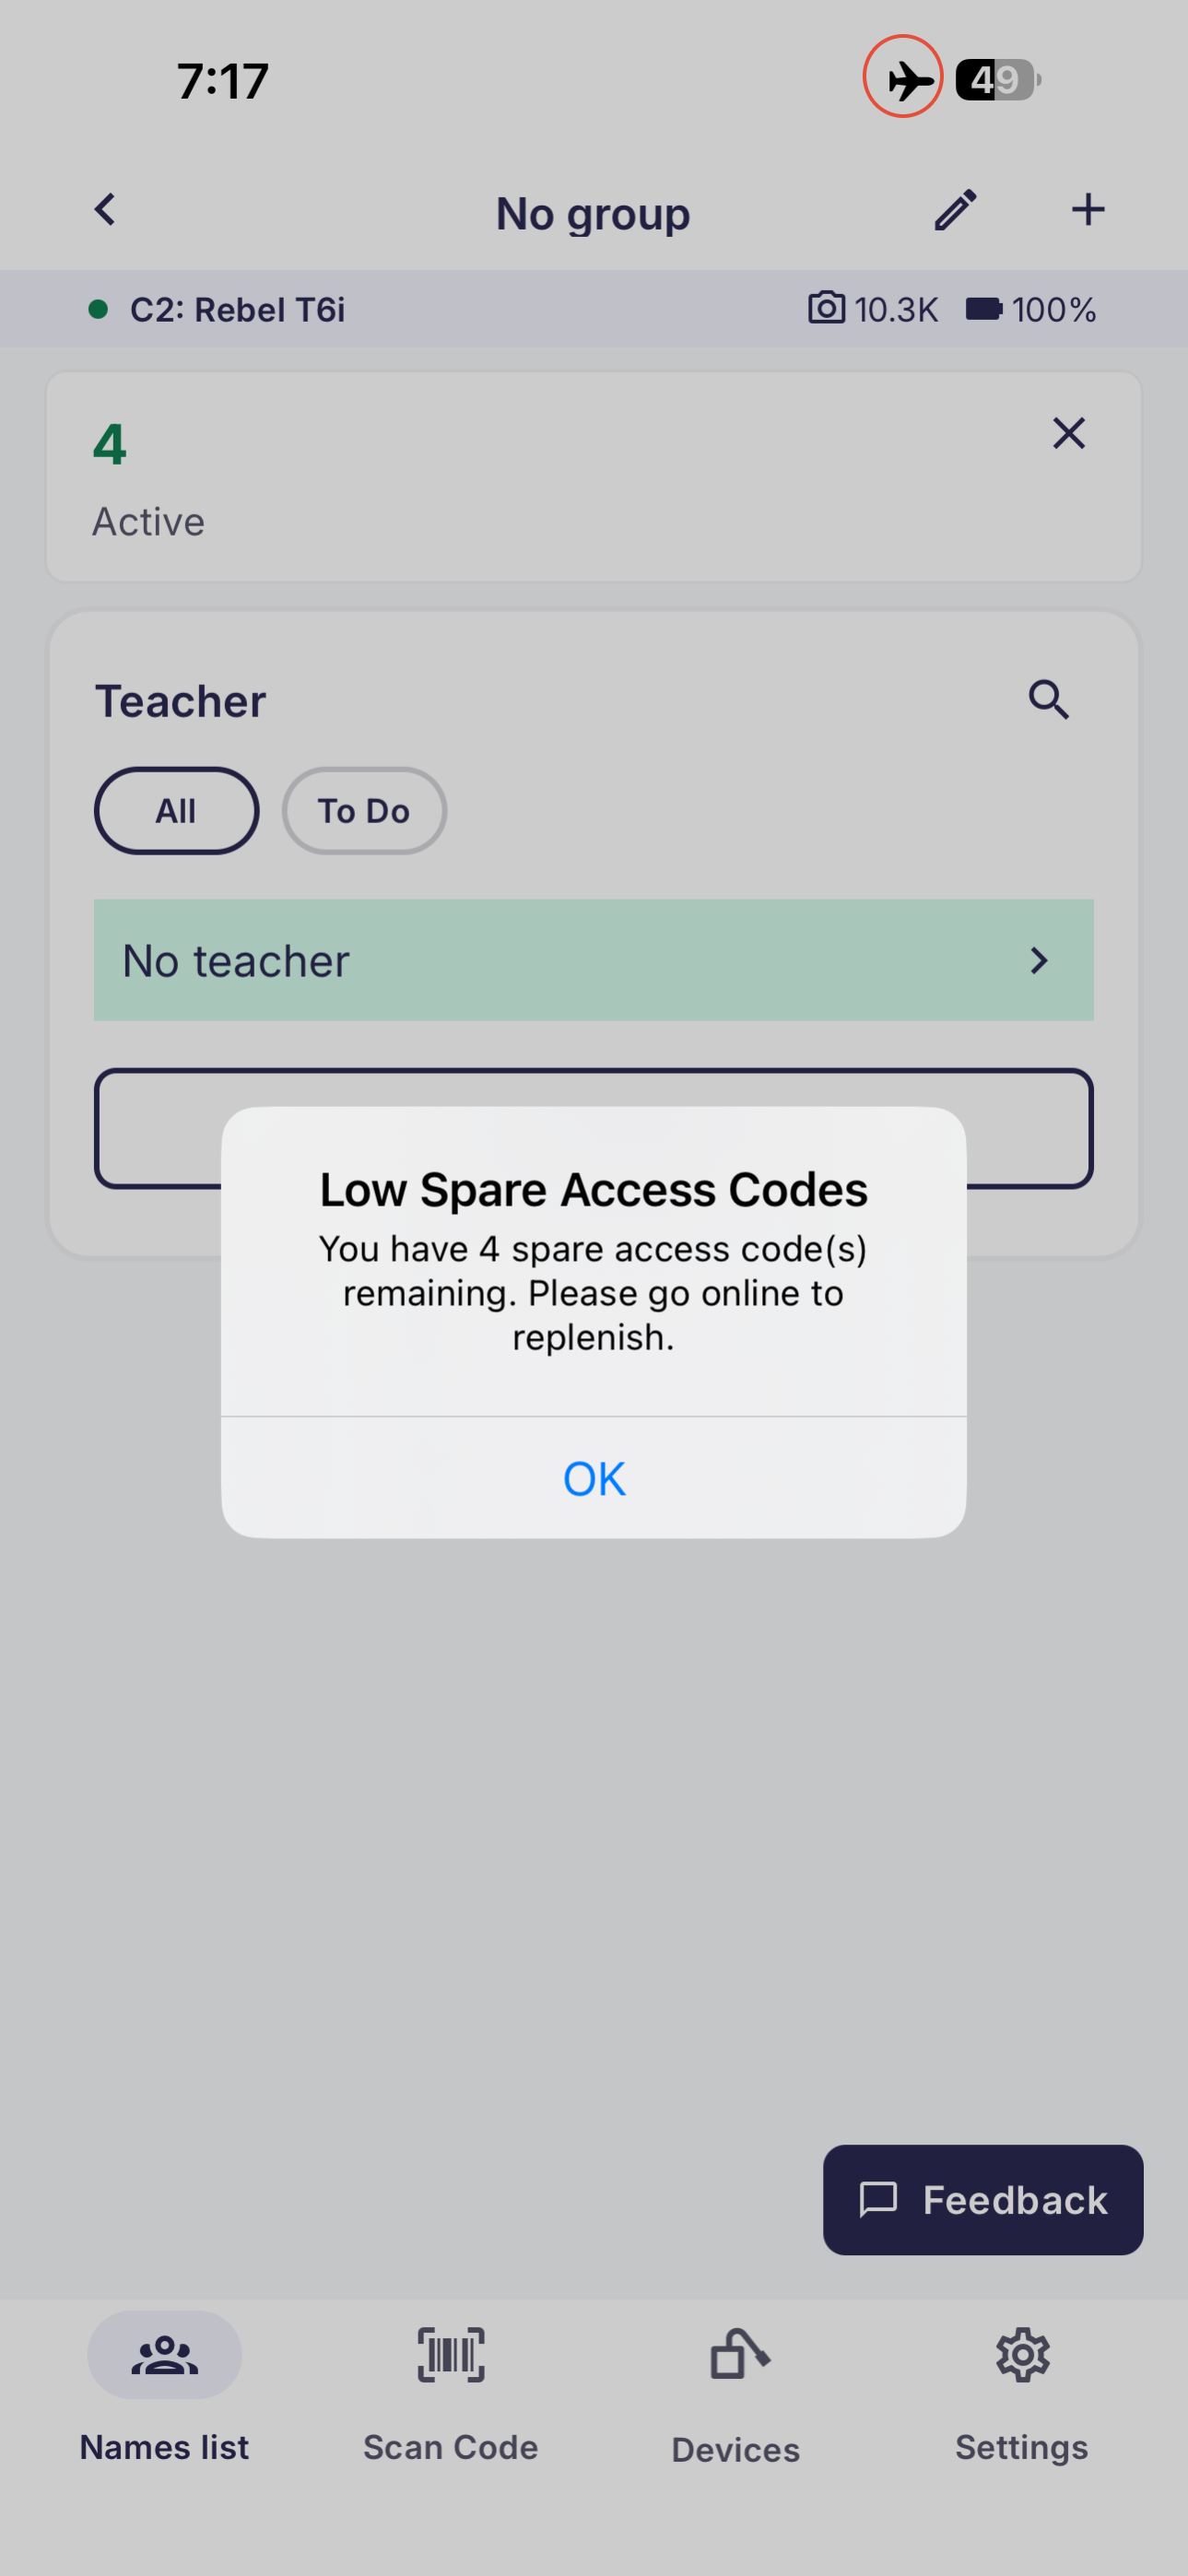
- Background Spares for offline usage: When a job is imported, we automatically generate background spares (10% of the subject list, minimum of 10) that you can use when you are offline. These aren't visible in the app or in the job. Once these spare entries are running low, the error "Low Spare Access Codes" appears, instructing you to go online again and sync to generate more. The error disappears after a successful sync.
Will custom access codes that contain hyphens (e.g., ABCDE-2027) activate without any issues when using Entagged and the GotPhoto app?
While hyphenated codes work fine with standard QR tagging, keeping your app setting on the default "Access Code" will prevent your images from activating in GotPhoto due to a metadata mismatch.
To ensure your galleries activate without any issues:
In the app's Tagging settings, change your Tagging code type from "Access Code" to "Barcode" for this job.
Key takeaways
The GotPhoto app offers a flexible and modern tagging experience for picture day.
- Use a physical Entagged device for barcode-based tagging workflows.
- Use Name List QR for a fully digital tagging workflow without additional hardware.
- Do not mix tagging methods within the same album. Upload them separately to avoid activation issues.
- Switch between methods carefully to ensure clean metadata and smooth processing.