
Table of contents
- Overview
- 1. Create your job
- 2. Upload a names list
- 3. Set up your job settings
- 4. Generate your QR cards
- 5. Convert the QR card PDF to a zip file with JPGs
- 6. Upload the QR card JPGs in Photo Management
- 7. Activate the access codes
- 8. Picture day
- 9. After picture day
- Takeaway
Overview
This article explains how to efficiently and securely set up a job for class photos, ensuring parents only see their own kids' photos. We'll focus on the proofing job workflow.
1. Create your job
For class photos, select the job type “School and Preschool” and the category “Class Photos Only.” For sports jobs, select the job type “Sports” and choose the relevant sport as the category.
2. Upload a names list
Upload a names list with student data, including Teacher and Class (UK), Grade and Homeroom or teacher (US), or the sports team name in the group field.
| Sample school names list: | Sample sports names list: | |
|---|---|---|
 |  |
3. Set up your job settings
- Add a price list.
- Your price list should only contain group photo prints. Please specify the availability of the prints in this price list for group photos only.


- Your price list should only contain group photo prints. Please specify the availability of the prints in this price list for group photos only.
- Set up your job coupon.

- If the job should be shipped to the school/league, select Batch Shipping and set your Batch Deadline.

- If the job should be shipped to the school/league, select Batch Shipping and set your Batch Deadline.
- Add your Archiving date.

- Add your automated campaign.
 Note: Ensure the Automated Campaign is configured with the appropriate triggers and filters so it successfully targets potential buyers and all customers.
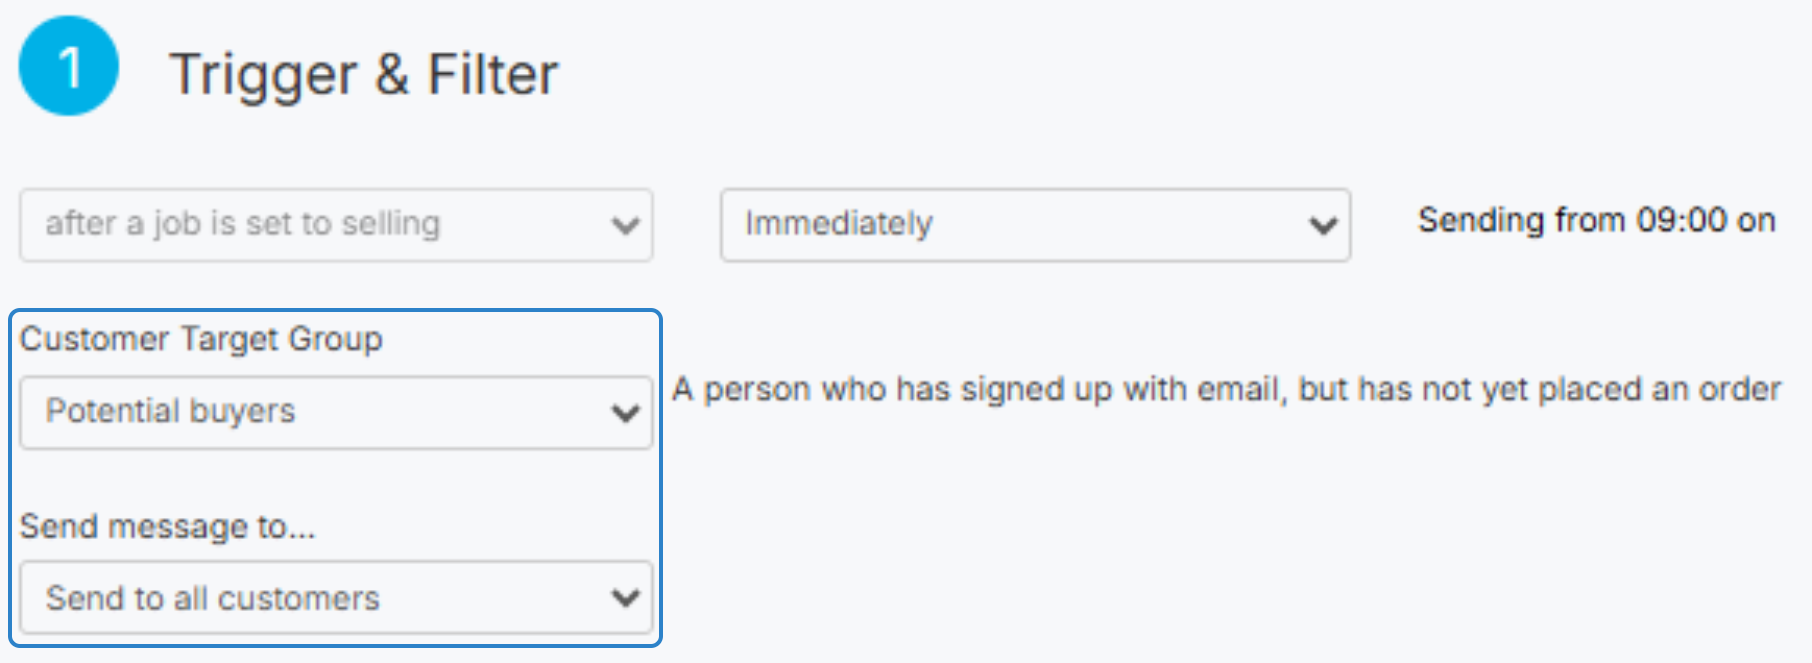
- Save the Settings.

4. Generate your QR cards
- Head to the QR cards tab in your job. Under the QR cards settings (Edit QR card layout), scroll down to the Advanced Settings. There, select one QR card per page.


- Click Save.
- Generate and download your QR cards.
5. Convert the QR card PDF to a zip file with JPGs
We recommend using Adobe PDF Converter or any other tool that offers this functionality.
Once you have converted the PDF, extract all the files from the zip file and delete the cover page. You will only need the QR card images.


6. Upload the QR card JPGs in Photo Management
- Upload the JPGs to Photo Management. We recommend using the EasyUpload tool for faster uploads.
- In EasyUpload, select the respective job and upload the JPGs to the Individuals section.

7. Activate the access codes
- Once all images have been uploaded, and you have verified that all QR card images show the green QR icon, click the Activate access codes button.

- In a second step, resort your photos based on the names list, and sort the images by the group scheme.

The system will now automatically create albums for each class/group/team, and will also sort the individual QR cards into their respective albums. This process may take a couple of minutes, depending on the number of images you uploaded. Once done, you can delete the now empty upload album.

- If you click into one of the created albums, you will notice that there's now one individual gallery for each subject that shows the hidden QR photo.
8. Picture day
- If you have parent contact details, there is no need for you to take any QR cards to the photo shoot. Instead, bring simple sheets where you have written down the individual team, class, or group names. For each group, write the name clearly on a sheet, then take a picture of this name sheet before capturing the group images. This will help in organizing and identifying the images later.
- If you don't have contact details available, bring the QR cards for all subjects and have the teacher / coaches hand them out to the subjects after the shoot. There is no need to photograph them.
9. After picture day
- Upload the group photos into the group section of each corresponding album.

- Switch the job to Selling.
Your customers can now purchase the group picture(s) in their preferred size.

Takeaway
The job setup for "Group/Class/Team Photos Only" jobs differs slightly from the regular workflow. By following all listed steps, you and also your customers will have a smooth picture day and shopping experience.