
 This article uses the SIMS format, which is primarily used by organizations in Europe.
 For information on the PSPA format that is primarily used in North America, learn how to run a student data export in PSPA format .
Table of contents
- Overview
- Job setup for student data exports
- Creating the SIMS export
- Creating a custom export
- FAQs
- The takeaway
Overview
Creating a student data export is an important feature in your account, as organizations frequently request them. With GotPhoto, this no longer has to be a long, tedious, and sometimes impossible task. You can acquire more organizations, save time, and stay organized by creating your student data export using GotPhoto. In this article, we'll review the steps necessary for creating a student data export in SIMS format.
Do you use the Arbor format? Follow the instructions further below for creating a custom export.
Job setup for student data exports
To run a student data export, the photo job must use the settings QR-Tagging — with list of names. The required columns are Firstname and Lastname. All other columns can be left blank, unless you would like their information included in the export.
When photos are uploaded, the first photo directly following each QR code (i.e., the index photo) will be used by default for the student data export. If you allow customers to select their favorite/yearbook photo, their selection becomes the index photo. Anyone who does not choose will keep the first image by default.
You can manually change the index photo after upload, but this may be time-consuming depending on the number of students you've photographed. We highly recommend taking the first photo in the correct format to save time.
Creating the SIMS export
Once all your images have been activated, you can complete the student data export by following these steps:
- You can access the Student Data Export area directly via your job's names list.
1. Open the job and click View names.
2. Next, click Student data export.

[Optional] You can also access this via the Communication tab in your Photo Job. Scroll to the Student Data Export box and click Overview. - Review who selected index photos, identify missing data or photos, and create or download exports using the interface options.

- Click the blue + Create export button in the upper right corner.
- Select the data source you want to export from and leave filters blank. Click Next.

- Choose export type (SIMS) and image file type (JPEG). Click Next.

- Configure export settings, such as file naming, folder structure, and optional inclusions. Click Preview.

- On the preview page, review visual summaries of missing or complete data and download student lists.


- Click Run student export in the top-right corner. To rename it, go to Actions > Rename.

Creating a custom export
If you don't have student IDs or use Arbor, create a custom export instead of SIMS:
- Select Custom under export file type.
- Choose a filename pattern. For advanced options, choose Custom again and select your preferred labels.
- [Optional] Select folder structure: by album, group, or a single folder.

- Continue with the student export flow as outlined above.
FAQs
What is the SIMS format?
SIMS is a format used by UK organizations. It outputs photos and a data file formatted for school systems.
Why are group and staff photos not exporting when I export student photos?
Group photos are not included in student data exports on GotPhoto; only individual photos are. One image per subject will be exported. For staff photos to be included in the export, make sure you've properly labeled them in your names list. Teachers should have a naming convention, such as "Staff" or "Teacher," written in the Group column on the names list.
How do I choose which image is exported (index vs. another photo) for each student?
For each student, the exported image is the index photo (the one with the star). By default, that’s the first photo taken right after the student’s QR code. If you enable favorite/yearbook photo selection, the student’s /parents' choice becomes the index photo (and overrides what you set before).
To pick a different export image:
- Photo Management → open the album → click the photo → click the star icon to make it the index photo. See also: Assign or change index and cover photos in GotPhoto
- In the Student Export preview (apply this workflow if the student or parent selected the wrong photo):
- In the Ready to Export section, find the student.
- In their row, open the Actions dropdown.
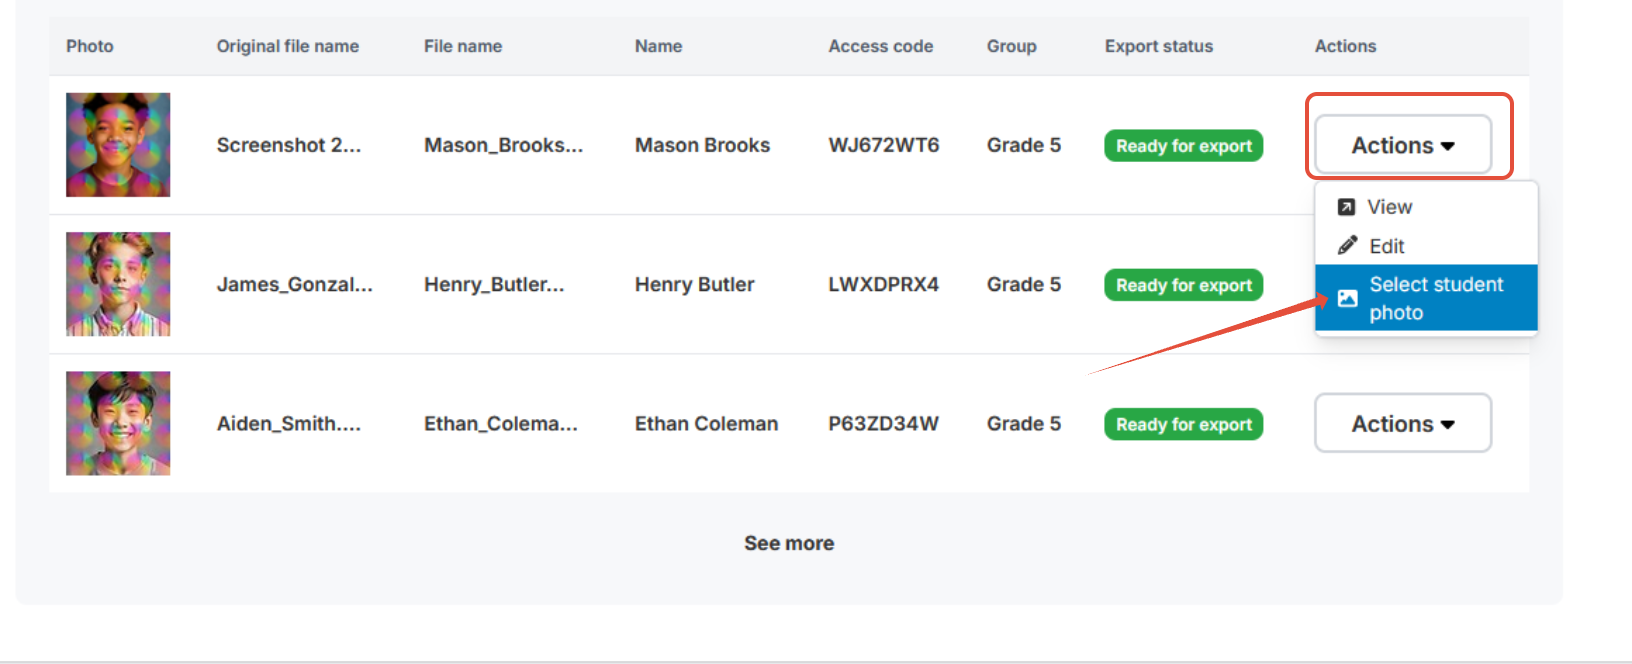
- Click Select student photo.
- A modal opens showing the student’s images.
- Click the image you want to use as the export/index image.
- Click Confirm; refresh the page if the index image did not change immediately.
If you change the student export index photo, it will only change for the export, not in the gallery.
Why does the index image appear off-center or misaligned in the student data export?
The index image may appear off-center or misaligned if the crop, focus, or image quality isn’t suited to its display. Troubleshooting:
- If vertical portraits are cropped awkwardly, adjust the crop or use a different aspect ratio for the cover.
- If the subject is not centered properly, reposition the crop to focus on the face or key area.
- If the system ignores a focal point, set a custom crop for the index image where possible.
- If heads are cut off on certain devices, preview the image on multiple screen sizes and adjust the crop accordingly.
- If the image appears soft or pixelated, replace it with a higher-resolution version.
How will my files be sorted in the SIMS export?
All images will be in a single folder.
What if some students are missing data or photos?
Update data via the “Missing students” tab. Upload photos in the Photo Management tab. Find the instructions in this article: Fix missing students or photos in the Student Data Export
Can I download photos in their original size?
This is possible when using the custom export option.
Why am I getting an error when creating a student data export?
If you receive an error while trying to create a student data export, it is usually caused by one of the following issues:
- An index image did not fully generate in the album due to an internet connectivity issue during the upload. Instead of the subject’s image, a crossed-out gallery icon is displayed. Re-uploading the image will resolve the issue.

- One of the galleries is missing an index photo. The fastest way to find the gallery is to review the names list for any subject without a preview photo, but one you know you have taken a picture of. Once you have identified the gallery, manually star one of the images and rerun the student data export.
- Review your names list: Duplicate entries for the same subject (both entries have the same student ID, but one is in class 5 and the other in class 9) or subjects with two access codes can also lead to an error. Please remove the incorrect entry from the names list or delete the student data associated with the second access code. Always double-check your data before deleting anything to avoid accidental data loss.
- Check the relevant names list entries to make sure no forbidden characters are present in any data fields.
Remove any forbidden characters and update the names list as described in "Updating a names list". Afterwards, refresh the page and run the student data export again.
The takeaway
By following the outlined steps, from setup to export, you can efficiently generate organized SIMS exports. This helps ensure all student data is captured correctly, saves time, and supports smooth delivery to schools.
Related articles: