
 This article uses the PSPA format, which is primarily used by organizations in North America. For information on the SIMS format that is primarily used in Europe, learn how to run a student data export in SIMS format.
 Table of contents
- Overview
- Job setup for student data exports
- Choosing an index photo
- Creating the PSPA or custom export
- FAQs
- The takeaway
Overview
Creating a student data export is an important feature in your account, as organizations frequently request them, or they are required if you're doing yearbooks. With GotPhoto, this no longer has to be a long, tedious, and sometimes impossible task. You can acquire more organizations, save time, and stay organized by creating your student data export using GotPhoto.
In this article, we'll review the steps necessary for creating a student data export in PSPA format. Throughout the article, important points related to yearbook jobs will be marked accordingly.
Job setup for student data exports
To run a student data export, the photo job must use the setting QR-Tagging — with list of names. The required columns are Firstname and Lastname. All other columns can be left blank, unless you would like their information included in the export. Teachers should have "Staff" written in the Group column.

Yearbook jobs: Under the job access type, select Yes - Yearbook photo under Customers can select their favorite photo? Next, set your selection deadline and click Save settings.

Choosing an index photo
When photos are uploaded, the first photo directly following each QR code (i.e., the index photo) will be used by default for the student data export. If you allow customers to select their favorite/yearbook photo, their selection becomes the index photo. Anyone who does not choose will keep the first image by default. Learn how to restrict customers from choosing certain photos.
While you can manually change the index photo once uploaded, this may be time-consuming depending on the number of students you’ve photographed. We highly recommend taking the first photo in the correct format to save time.
Yearbook jobs: Give your customers time to select their photo in your shop. The timing you give them likely depends on when the school is expecting the yearbook photos or student IDs. Most photographers use the archiving date as a trigger in their communication profile to drive customers to their shop to select their pose.

Selected photos will have a heart icon on the frame on the Photo Management page. You can also select the photo for the customer by clicking the index star on any highlighted photo.

Important:
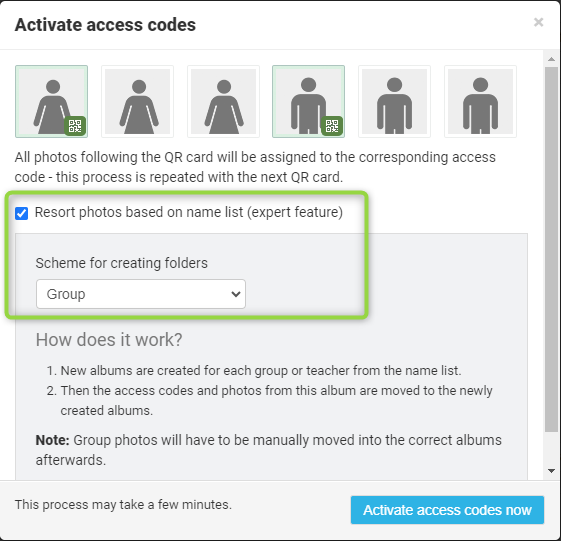
To ensure the download package is separated by the Group column in the names list (i.e., sorted by class), please be sure to check the Resort photos based on names list box and select Group from the dropdown when activating access codes. The file folders in the download package are sorted by the album names in Photo Management; if the albums are not resorted by Group, only the originally created album names will appear.
Creating the PSPA or custom export
Once all your images have been activated, you can complete the student data export by following the short steps below.
- [New] You can now access the student data export area directly via your job's names list.
1. Open the job and click View names, or open the job's Subjects tab.
2. Next, click Student data export.

- You will be directed to this page, where you can:
- View who selected the index images.
- Check students with missing data or photos (you can download the list that includes all galleries/students with issues).
- Create your export by pressing the black Create export button on the top left of your screen.
- View and download previous exports via the Actions button next to each export.

- Click the blue + Create export button in the upper right corner to begin the export process.
- On the next screen, select the data source you would like to create your export from (1) and how you would like to filter the export (2). Make sure to select the groups/teachers/albums you would like to include in your export. The filtering option only determines which subject pictures are included in the export, not how they will be grouped in the export.
 Click Next to continue.
 - On the next page, select the formatting for your export. You can adjust the export type (1), sizing (2), crop (3), image file type (4), and background (5).

Export file types:
- PSPA: This is the export type most commonly used in North America. It includes images in the standard sizes 640px x 800px or 1280px x 1600px, and a text file ("Index File"); optionally, you can add a CSV file.
- Custom: Allows you to select the exported images' size and the file names' pattern. You can select from various file sizes, including the original photo file size; we also added an option to define a custom file size.
- SIMS: Only relevant for photographers in the UK
- Next Gen Roster: Data export for US/CA users of the legacy Next Gen workflow
- Pixnub Composites: Data export for Pixnub users (US). Learn more here: DIY Sports Graphics: QMate, data export for Pixnub & Team Photo Composite
- Choose the settings for your exported files. You can also upload additional files to send to your organization as part of the export.

- Select a file name: Make sure you select a file name format based on information within the photo job (e.g., don't select "Identifier" if you do not have an Identifier column in your names list). Failure to do so will result in an error.⚠ Important: Some characters, such as full stops (periods) cannot be pulled from the Identifier field into your export.
Here is a complete list of allowed characters:- All standard alphabetical characters, in both upper- and lowercase.
- All numbers
- Spaces and underscores (Spaces will automatically be converted to underscores during the export process)
- Apostrophes
- The following diacritical characters:
ÀÁÂÃÄÅÆ Ç ÈÉÊË ÌÍÎÏ Ð Ñ ÒÔÕÖ ÙÚÛÜ Ý Þ ß àáâãäåæ ç èéêë ìíîï ðñòóôõö ùúûüý þ ÿ Šš ČčĆć Đđ
- [Optional] Include students without photos or incomplete data: This is not recommended unless schools request it.
- [Optional] Include student data as a CSV file: Essentially, this is an export of the student data as it appears in the job's list of names.
- Select folder structure: Pictures can be grouped by album or group names.

- Sorting by album follows the album structure you’ve created in Photo Management. If you want your images grouped by album, ensure they are first sorted into the appropriate albums in Photo Management, as explained here.
- Sorting by group uses the information in your Names List. Images will be grouped according to the value entered in the Group column of the Names List.
- Select a file name: Make sure you select a file name format based on information within the photo job (e.g., don't select "Identifier" if you do not have an Identifier column in your names list). Failure to do so will result in an error.
- On the following screen, you will see some key insights into the student export you have set up.
The top bar shows a visual representation of how many students are missing photos or data, and how many access codes are missing students:

The next section breaks down the format and settings of your planned export, as well as provides the ability to download lists of missing students and students in general:

The Missing Students section provides you with an in-depth look at students missing photos or required data:

Data can be updated by clicking on Actions > Edit. Missing photos must be uploaded from within the Photo Management tab.
Finally, the Ready to export section will show a list of all students who are ready for export:

You can use the Actions dropdown to select an alternative photo under Select student photo.
- Click the blue Run student export button in the upper right-hand corner to begin your export.
- You will be notified via email once your student data export is complete. The export status will first show a New label, then turn into Generating. Once it is finished, return to the Student Data Export screen. The status will now show the label Generated. Click Actions to download the ZIP file. In the rare case where you see an Error status, please click >Actions > View logs. The log may provide useful information as to why the export failed.

- You can now rename your export package, making it easier to distinguish from previous exports. Simply click Actions > Rename.

FAQs
What is the PSPA format?
PSPA is a standard format for student data exports, primarily used by organizations in North America. It typically includes images in standard sizes, a text file, and an optional CSV file for student data.
What is an index photo?
The index photo is the default image used for a student's data export. By default, it's the first photo following their QR code. If enabled, customers can select their preferred "favorite photo" or "yearbook photo," which then becomes the index photo.
Why isn’t the photo I selected showing in the student export?
If you enabled the option for customers to select their favorite or yearbook photo, their selection automatically becomes the index photo. This selection overrides the photo you previously set.
How to adjust the photo for the export:
- Open the Student Export preview.
- Scroll down to find the student whose photo needs adjustment.
- Click Actions.
- Select Student Photo.
- Choose the correct photo and confirm.
- Run the export again.


Important: This change only applies to the current export. It is a one-time adjustment and will not be saved permanently.
Why are my images not separated by class, teacher, or group name in the final PSPA export file?
This usually happens when the images or data aren’t set up correctly.
- Make sure your photos are sorted into the correct albums in Photo Management (using the "resort photos based on names list" feature).
- Ensure the names list columns group and/or teacher (depending on how you sorted the albums) are filled in consistently, and use the exact same spelling for each group and/or teacher.
How do I choose which image is exported (index vs. another photo) for each student?
For each student, the exported image is the index photo (the one with the star). By default, that’s the first photo taken right after the student’s QR code. If you enable favorite/yearbook photo selection, the student’s /parents' choice becomes the index photo (and overrides what you set before).
To pick a different export image:
- Photo Management → open the album → click the photo → click the star icon to make it the index photo. See also: Assign or change index and cover photos in GotPhoto
- In the Student Export preview (apply this workflow if the student or parent selected the wrong photo):
- In the Ready to Export section, find the student.
- In their row, open the Actions dropdown.
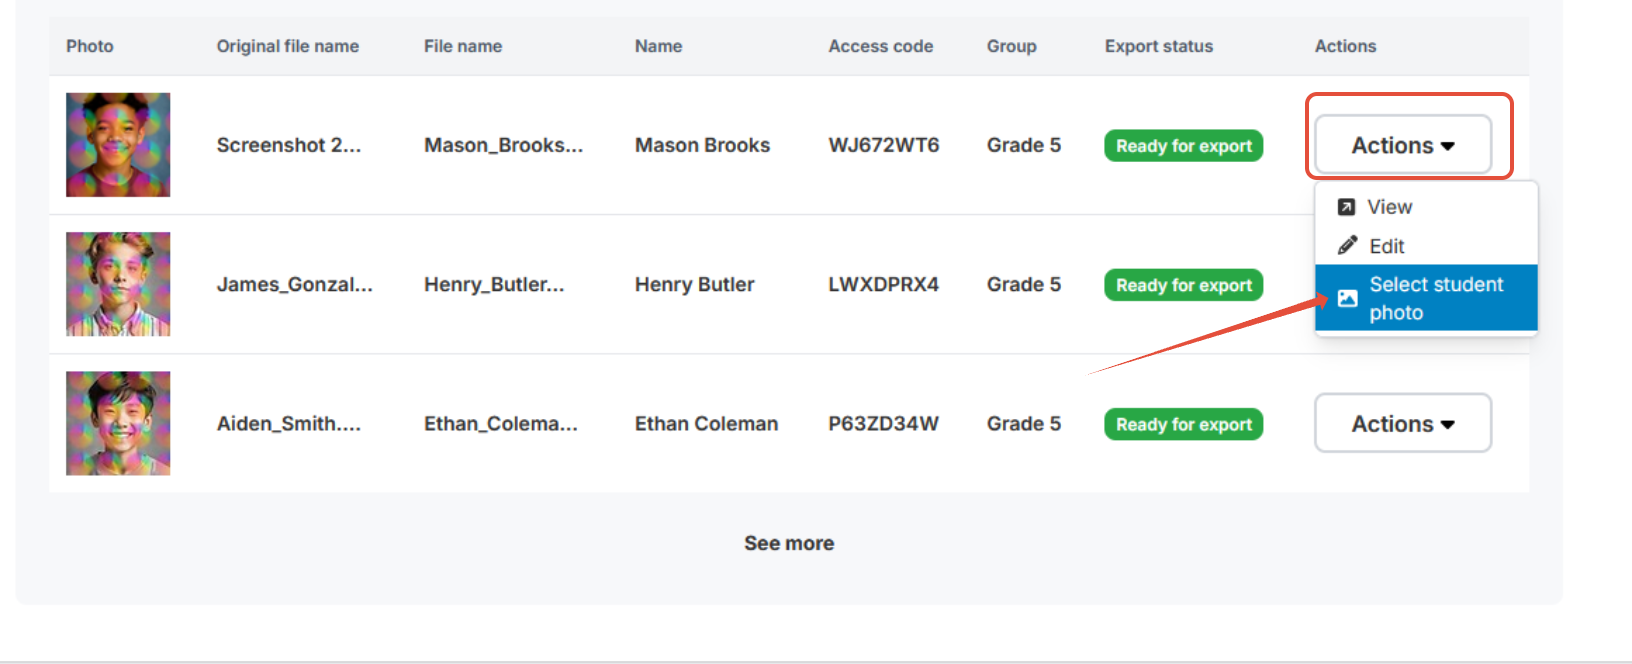
- Click Select student photo.
- A modal opens showing the student’s images.
- Click the image you want to use as the export/index image.
- Click Confirm; refresh the page if the index image did not change immediately.
Why does the index image appear off-center or misaligned in the student data export?
The index image may appear off-center or misaligned if the crop, focus, or image quality isn’t suited to its display. Troubleshooting:
- If vertical portraits are cropped awkwardly, adjust the crop or use a different aspect ratio for the cover.
- If the subject is not centered properly, reposition the crop to focus on the face or key area.
- If the system ignores a focal point, set a custom crop for the index image where possible.
- If heads are cut off on certain devices, preview the image on multiple screen sizes and adjust the crop accordingly.
- If the image appears soft or pixelated, replace it with a higher-resolution version.
What if some students are missing data or photos?
Please refer to this article: Fix missing students or photos in the Student Data Export
Why are group and staff photos not exporting when I export student photos?
Group photos are not included in student data exports on GotPhoto; only individual photos are. One image per subject will be exported. For staff photos to be included in the export, make sure you've properly labeled them in your names list. Teachers should have a naming convention, such as "Staff" or "Teacher," written in the Group column on the names list.
Why am I getting an error when creating a student data export?
If you receive an error while trying to create a student data export, it is usually caused by one of the following issues:
- An index image did not fully generate in the album due to an internet connectivity issue during the upload. Instead of the subject’s image, a crossed-out gallery icon is displayed. Re-uploading the image will resolve the issue.

- One of the galleries is missing an index photo: The fastest way to find the gallery is to review the names list for any subject without a preview photo for which you know you have taken a picture. Once you have identified the gallery, manually star one of the images, then rerun the student data export.
- Review your names list: Duplicate entries for the same subject (both entries have the same student ID, but one is in Grade 5 and the other in Grade 9) or subjects with two access codes can also lead to an error. Please remove the incorrect entry from the names list or delete the student data associated with the second access code. Always double-check your data before deleting anything to avoid accidental data loss.
- Check the relevant names list entries to make sure no forbidden characters are present in any data fields.
Remove any forbidden characters and update the names list as described in "Updating a names list". Afterwards, refresh the page and run the student data export again.
The takeaway
By following the outlined steps, from setting up the necessary parameters to running the export, you can easily generate organized exports for the PSPA format. This feature not only streamlines your workflow but also provides insights into missing data or incomplete photos, ensuring a comprehensive and hassle-free student data export experience.
Related articles: