
Table of contents
- Overview
- Create a new price list
- Add a product package to a price list
- Sort your packages
- Add à la carte (individual) items to a price list
- Add downloads to a price list
- Add retouching to your price list
- Set prices within your price list
- Set basket limitations
- Duplicate a price list
- FAQ
- The takeaway
Overview
Your price lists can include product packages, digital downloads, à la carte (individual) items, retouching, and extra backgrounds (for green screen /extraction jobs). After you create a price list, you can link it to multiple jobs.
In this guide, you will learn how to create a new price list, add à la carte items and downloads, set prices and limitations, add retouching, and duplicate a price list.
Create a new price list
In-product tour [available in US & Canada]
Explore the in-product tour “How to set up my Photo Job” during account creation or anytime from the Help tab in the top-right menu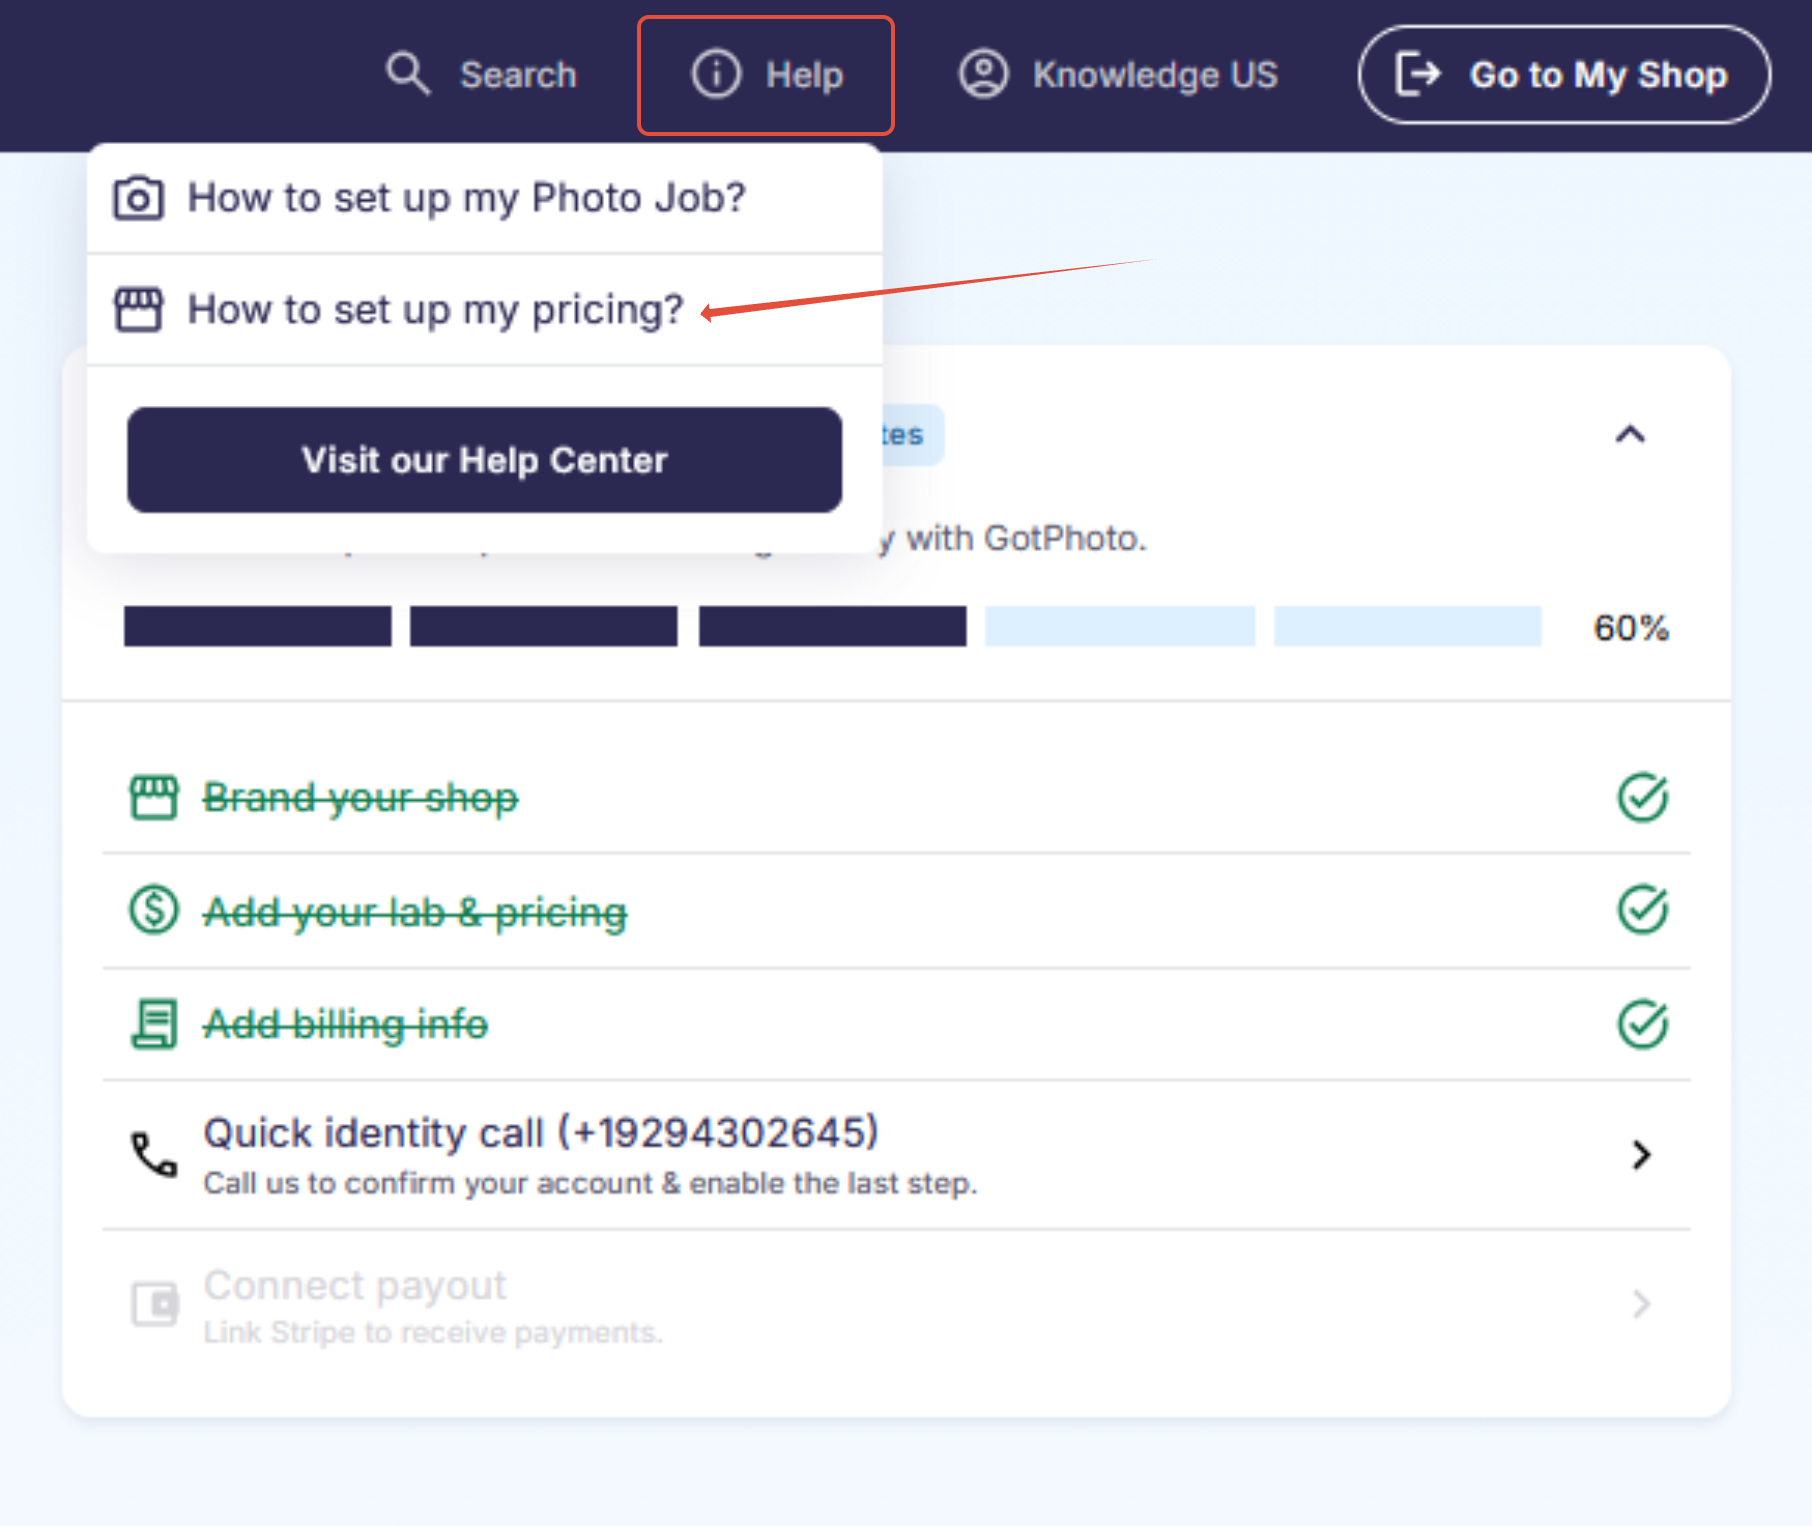
Video walkthrough
This section shows how to create a price list and start adding items.
- Open the price lists page by selecting Products & Prices in the left menu and then the Price Lists tab.
- On the price lists page, select the blue + Create price list button.

- Name your price list and select Next.

- Select your packages, downloads (digital products), à la carte products, retouching, and green screen backgrounds using the Add buttons.

Add a product package to a price list
Add preconfigured product packages to streamline ordering.
Make sure you have created a product package before continuing.
- Next to your price list, select Actions → Edit to open it.

- To the right of Packages, select Add.

- Review your list of packages. Select Package details to view contents, or select the green Add to include the package in your list.

- A popup shows package content, quantities, and restrictions. Select Edit to adjust, or close the popup to keep defaults.

- When finished, select < Back & set prices.
- From within the price list, you can now:
- Set the selling price: The amount customers pay at checkout (plus tax).
- [Optional] Set the recommended price: Shows the package’s higher value versus the discounted shop price (proofing only).
- [Optional] Add upselling (recommended): Prompts customers with add-ons when they select this package (proofing only).

Sort your packages
Order packages by price, so shoppers see higher-value options first.
The best practice is to sort packages by shop price from highest to lowest. On the price list overview, drag and drop packages into the desired order. Please note that in the shop, the Download All package will always be displayed first.
Dashboard view: the highest price appears at the bottom and the lowest at the top.
Shop view: “Download all” is listed first by default:
Add à la carte (individual) items to a price list
Add individual products your customers can buy alongside or instead of packages.
- Next to your price list, select Actions → Edit to open it.

- To the right of À la carte (UK customers: Individual Products), select Add.

- To add a product, select Add. To remove a product, select Remove.

- When finished, select < Back & set prices.
- From within the price list, you can now:
- Set the selling price: The amount customers pay at checkout (plus tax).
- Assign to photos (“Available for”): Choose whether the product can be ordered for all photos, only individual photos, or only group photos. We recommend assigning small/portrait products (wallets, mugs, buttons, etc.) to Individual photos so customers don’t order them for a group photo.

Add downloads to a price list
Digital downloads are popular, easy to deliver, and have no lab costs.
Customers receive downloads by email within a few minutes of purchase, unless the job is set to manual revision. Digital products are sent immediately, even when part of a batch shipping order.
We recommend adding one or two of these options:
- Individual download (single photo). We recommend restricting downloads to individual photos, because group photos can easily be purchased and shared.
- Free download. Allows customers to download images from the store at no cost. Please note: free download is not restricted to one photo—customers with access to multiple photos can download each one. Backgrounds will not be applied to free downloads.
- Download all photos(typically ~3–8 photos per subject).
- “Download all photos” applies per access code. If you are using different access codes for different outfits for the same child (e.g., dance), this product will only apply to one outfit. See the pro tip below for an alternative.
Pro tip
If the number of pictures per child varies a lot, create a package with a fixed number of digital products instead of using “Download all photos.” This controls how many photos a customer receives for a set price.
To add digital downloads to your price list:
- Next to your price list, select Actions → Edit to open it.
- To the right of Downloads, select Add.

- Select Add to include a download product.

You can add additional download sizes by selecting Add other download sizes.... - When finished, select < Back & set prices.
- From within the price list, you can now:
- Set the selling price: The amount customers pay at checkout (plus tax).
- Assign to photos (“Available for”): Choose whether the download is available for all photos, only individual photos, or only group photos. Most downloads should be Individual photos to prevent a group photo from being shared with everyone in it.
- [Optional] Add upselling: Offer add-ons when the customer selects this download product.

Where do I control the download size of the images customers purchase?
You can control the file size or resolution for all digital downloads by configuring your price list settings. When editing your price list, go to the Downloads section and click Add to create a new digital download product. Here, you’ll see an option to Add other download sizes...—this allows you to specify different download sizes or resolutions for your digital products. You can add multiple sizes if you want to offer customers a choice, or set a single size to standardize all downloads. Be sure to save your changes when you’re done to apply these settings to your shop’s digital downloads.
Add retouching to your price list
Please note that the retouching feature is only supported in the new shop. Review the details here: The retouching feature .
- Next to your price list, select Actions → Edit to open it.
- To the right of Retouching, select Add.

Set prices within your price list
Use the price columns to control what shoppers pay and how values display.
Your selling price is the price customers pay in your online shop.
Update the green Selling price column in your price list. Changes are saved automatically, indicated by a green “Changes saved” banner at the top of the page.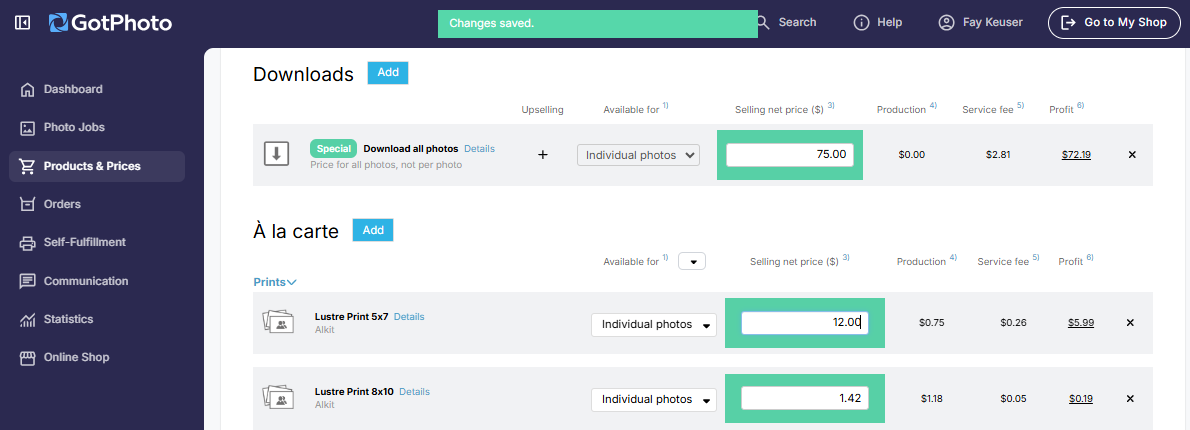
If a selling price is below the lab’s production price, it’s marked in red as a warning.
Best practices: pricing guidelines
- The 8×10 is the most popular item. Price it first, then price other items relative to it.
- Price your à la carte items before packages. Packages should offer a discount versus buying items individually.
- Increase savings with higher-priced packages. Aim for ~11–15% off for the lowest package, ~19–23% for mid-tier, and ~29–33% for the highest.
- Price “Download all photos” as a savings. Multiply the individual download price by the average photos per child, then discount ~5–10%.
- [Proofing only] Upsell add-ons below standalone pricing. For example, “Download all photos” should cost less as an upsell than as a standalone product.
Next to product packages, the Recommended price column shows the package value compared to the discounted selling price. Update the Recommended price column—changes save automatically.
Here’s how the recommended price appears to customers in the shop:
Set basket limitations
Use limitations to encourage larger purchases. Open Actions → Settings within your price list to configure them.

Only one limitation can be active at a time. ⚠ Important: Changes apply to all photo jobs using this price list. Consider duplicating the list and editing the copy.
A. Make purchase of a package mandatory
Require shoppers to add a package before they can add any à la carte items.
- Open price list Settings and select Purchase of a package is mandatory.
 You can apply the limitation to each access code or once per order (e.g., require one package per child, or one package per multi-child order).
 - Select Save.
B. Set a minimum order value
Show a warning at checkout if the order is below the minimum amount.
- This feature is not enabled by default. Please contact Customer Care to enable it for your account.
- Open price list Settings, select Minimum order value (UK customers: Order Threshold), and enter the amount.
 Choose whether to apply the limitation to each access code or once per order (e.g., per child vs. a single multi-child order).
 - Select Save.
Duplicate a price list
To avoid making changes to price lists in other existing jobs, copy a price list so you can reuse its structure and settings.
- On the price lists page, find the list to copy and select Actions → Duplicate.

- A copy is created. To rename it, select Actions → Edit.

- Inside the price list, select Actions → Settings.

- Rename the price list and select Save.

- You’re all set. Make any needed changes to products or pricing in the duplicated list.
Note: If you’re also planning to adjust the packages, please be sure to duplicate them first and replace the existing packages in the price list with the duplicated versions.
FAQ
Can I use two different labs for the same price list?
It is not possible to offer products from two different lab partners on the same photo job. Price lists and product packages can only be built with a combination of one lab partner, plus Your Own Product offerings, or one lab partner and offerings from your GotPhoto Production Tab.
Why does changing the name of packages in a copied price list also change them in the original price list?
This is intended behavior! All changes made to product packages in price lists will also reflect everywhere you've included that package. If you rename a product package or change any settings inside of it, these changes will also take place in every other location of that package on your price lists. Our system logic helps save time on admin work when managing price lists and product packages.
How can I create a price lists for free shipping?
You can provide free shipping to customers by:
- Offering it through a job-level coupon
- Creating a custom voucher
- Activating batch shipping on the job settings
It is not possible to offer free shipping to customers through a price list, because all lab-partner products have hard-coded production and shipping costs assigned to them, which cannot be adjusted or changed by the photographer or by GotPhoto Support.
If you are creating and fulfilling products in-house or through a third party using the GotPhoto Production Tab, then products without a postage group assignment will not enforce a shipping charge by default.
How do I create a link for a specific product?
Unfortunately, this is not possible. You do have the option to export your price list as a PDF and provide that to your clients.
Can I download a price list to use it for acquisition?
Yes. Go to the relevant price list and click Actions > Download price list as PDF.
If you notice that the email address shown there is no longer up to date, our Customer Care team can help update the email address. They’ll be happy to update it for you.
Where can I control whether packages or à la carte items are shown first when customers enter the shop?
You can control this in your shop settings: Online Shop → Shop Settings → Purchasing steps
There, you can choose whether packages or à la carte items (photos) are shown first when customers enter the shop.
Rule of thumb: If your galleries have 15 photos or fewer, show packages first. If your galleries have more than 15 photos, show the à la carte section (photos) first.
Can I add the group photo as an add-on to the Download All package?
If you’d like to offer a printed group photo together with the Download All package, the best approach is to create a product package that includes a single group photo product, and then add the Download "all available individual photos" as a $0 upsell in the price list.
The takeaway
Price lists are fully customizable. Create the list, add packages and à la carte items, include downloads and (where available) retouching, set your pricing and limitations, and duplicate lists to reuse successful setups. This workflow keeps your shop clear, consistent, and optimized for sales.
Related articles: